Installing the Plugin
Important: Please ensure your system meets the minimum technical requirements before installing this plugin.
After you purchase and download the Uncanny LearnDash Groups plugin, you can simply sign into your WordPress site as an administrator and navigate to Plugins > Add New. To install the plugin, click Upload Plugin to start the process. After installation and activation, you will be directed to the License Activation page to enter your license key and activate the plugin. The plugin must be activated to receive automatic updates.

Tip: The plugin download link and the license key are included in the purchase email (look for the hyperlinked file name, but note that it does expire after 48 hours) and are also available from within your Uncanny Owl account on this site.
Once the plugin is installed and activated, you can start setting up the basics! Note that plugin activation does create some new pages on your site and set up some default email templates. Settings for Uncanny LearnDash Groups can be accessed by administrators from the WordPress back end under Uncanny Groups > Settings.
Group Management Page Setup
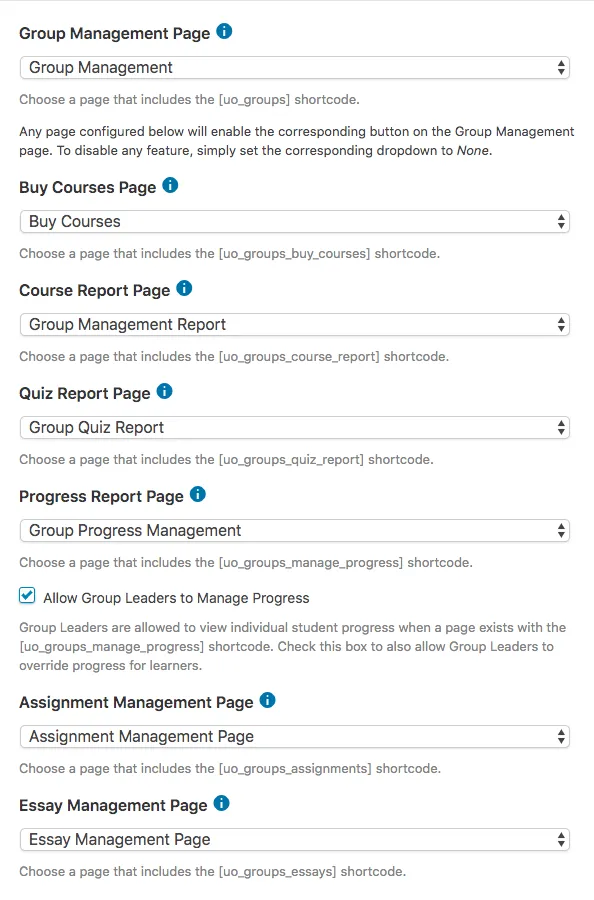
The first section of the Settings page identifies which pages (in the WordPress front end) are used for group management. These pages are created and added here automatically when the plugin is installed, but they can be modified as needed. Selecting associated pages here makes sure that the buttons on different pages link to each other properly.
Note: Selecting the option “None” in a dropdown hides the button associated with that page from the group management interface.
General Options
The next section of the Settings page lets you customize the Per Seat Text displayed to users, For example, you may prefer to use “Per License” or “Per User”. Whatever custom label you decide to use, seats will be tracked based on the groups created and the number of seats made available for each group.
 There are also optional settings that can be enabled or disabled:
- Allow Group Leaders to remove students at any time
By default, Group Leaders cannot remove students from groups once the students have started course activities. Checking this box ignores this rule and allows Group Leaders to remove students at any time to free up seats. - Do not free up a seat when a student with “Completed” status is removed
When a student is removed from a Group by a Group Leader, the available seat count is normally increased. Checking this box does not change the seat count when students who have completed all courses in a group are removed from it. - Group Leaders don’t use seats
Group Leaders added to the group as Group Members by a Group Leader have course access but will not use seats. Be careful with this option, as Group Leaders can exploit this to give unlimited students course access. Changing this setting will not affect current seat counts. - Do not add Group Leaders as Group Members
Group Leaders will not be added to groups as members, will not take a seat and will not have course access. Changing this setting will not affect any existing memberships. - Allow Group Leaders to edit users
Group Leaders will be able to click a user’s name in the Group Management table to bring up a dialog that lets them change the user’s first name, last name, email address and (optionally) username. - Allow Group Leaders to change username
Enables changing of a user’s username if Allow Group Leaders to edit users is checked. - Use Progress Report instead of Course Report for individual users
Direct Group Leaders to the Progress Report instead of the Course Report when drilling down into a user’s progress from the Group Management page. - Show “basic” (non-upgraded) groups in front end with access to reports only
This option makes all LearnDash groups available in the front-end interface. Groups that were not created or “upgraded” with Uncanny Groups will give Group Leaders access to reporting functions (course, quiz, assignments, essays and progress), but not user management functions (add/invite/remove). If this option is disabled, basic groups will not be visible in the front-end interface.
LearnDash Options
These settings were added in the Uncanny Groups 3.9 release.
- Use LearnDash “legacy” course progress data
Use slower usermeta data records for reports to match ProPanel reports; this is generally not recommended but offers a fallback option. - Hide the Courses / Users column in the list of LearnDash groups
For sites with a log of groups and/or users, improve the time to load the list of LearnDash groups by hiding the Courses / Users column. - Include data from child groups in reports
When Group Leaders view the Group Management page and reports for parent groups, combine records for the related groups as well as all child groups beneath the selected group.

eCommerce Options
The options in this section only apply if you are using WooCommerce to sell group access to your users.
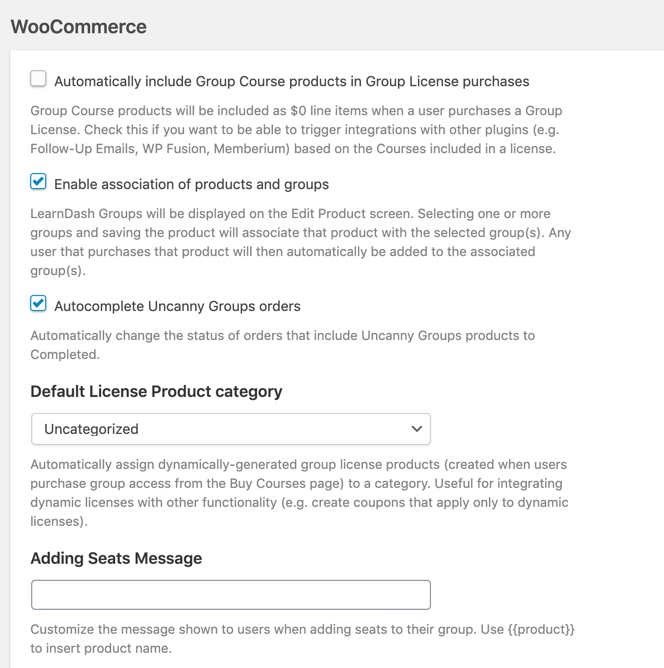
- Automatically include Group Course products in Group License purchases
Group Course products will be included as $0 line items when a user purchases a custom or pre-configured Group License. Check this if you want to be able to trigger integrations with other plugins (e.g. Follow-Up Emails, WP Fusion, Memberium) based on the courses included in a license. - Enable Association of products and groups
When checked, this option enables you to associate LearnDash Groups with WooCommerce products so that purchasing the product automatically adds the purchaser to the associated group. Learn more. - Autocomplete Uncanny Groups orders
Turn this on to autocomplete orders that include Uncanny Group product types. This will only work if the products are virtual (both the Uncanny Groups products, which is the default setting, as well as other product types in the same order). - Default License Product Category
Group License products are created automatically when users build and purchase custom Group Licenses. Selecting a category from this dropdown automatically adds these dynamically created products to the selected product category. This enables admins to set up coupons, tax rules, or other plugin integrations that automatically apply to products in specific categories (such as category-specific coupons or discounts, or category-specific tax rules). - Adding Seats Message
Optionally add a message that is displayed to users when they are adding seats to their group.
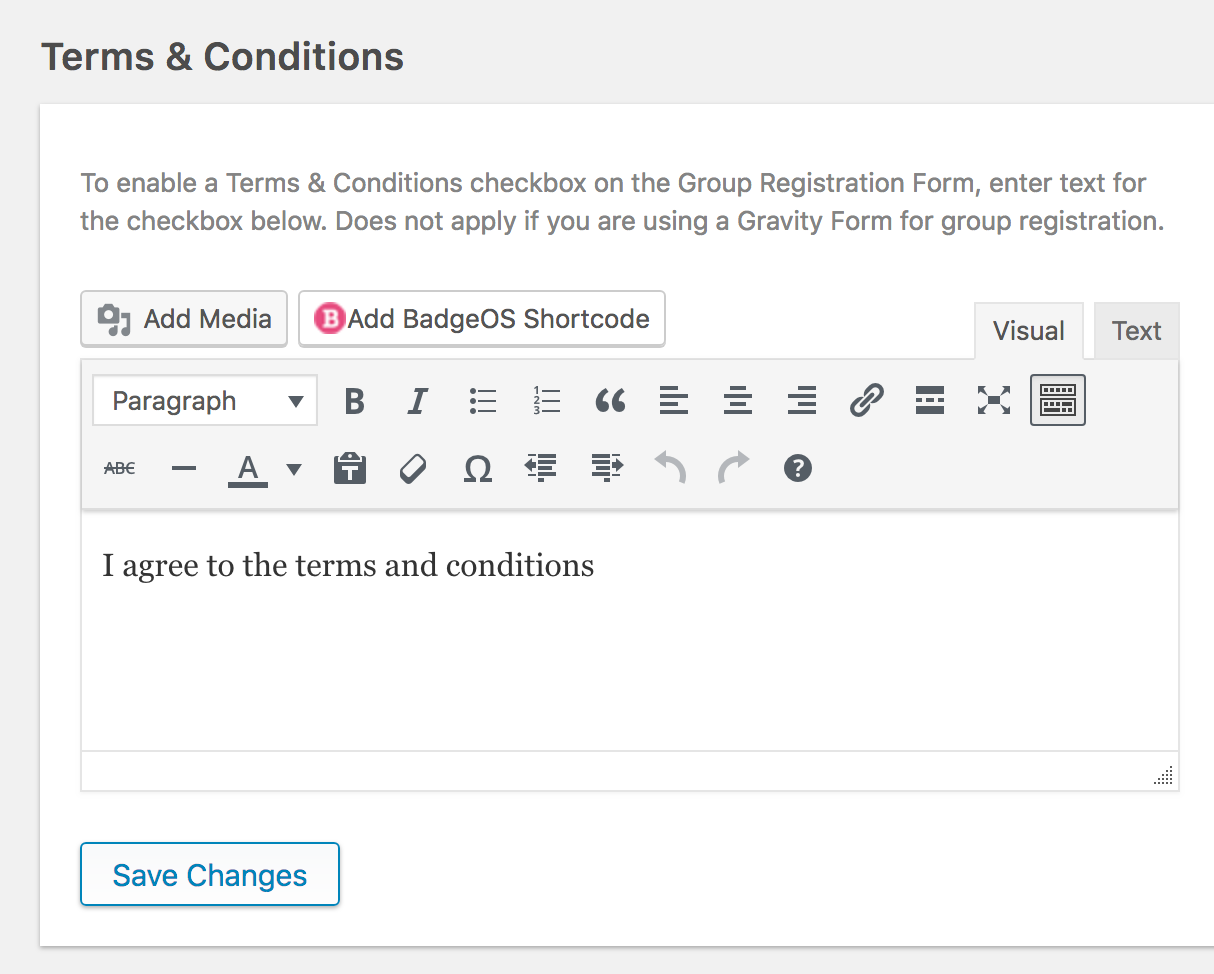
Group Registration Form Terms & Conditions
Adding text to this option will display a Terms & Conditions checkbox with the associated message on the built-in Group Registration form.