
Overview
The [uo_groups_create_group] shortcode lets Group Leaders and administrators create new LearnDash groups from any page on your WordPress front end — no admin access required. Place it on a Group Management page to give Group Leaders a self-serve way to set up their own groups.
Before You Start
- Uncanny Groups must be installed and activated (version 2.6 or later).
- You need a published WordPress page where you want the group creation form to appear.
- The user viewing the page must be logged in as a Group Leader or Administrator to see and use the form.
Add the Shortcode to a Page
- In your WordPress admin, open the page where you want the form to appear (or create a new page).
- Add the Create Group block (search Uncanny Groups in the inserter) — or add a shortcode block containing:
[uo_groups_create_group]- Publish or update the page.
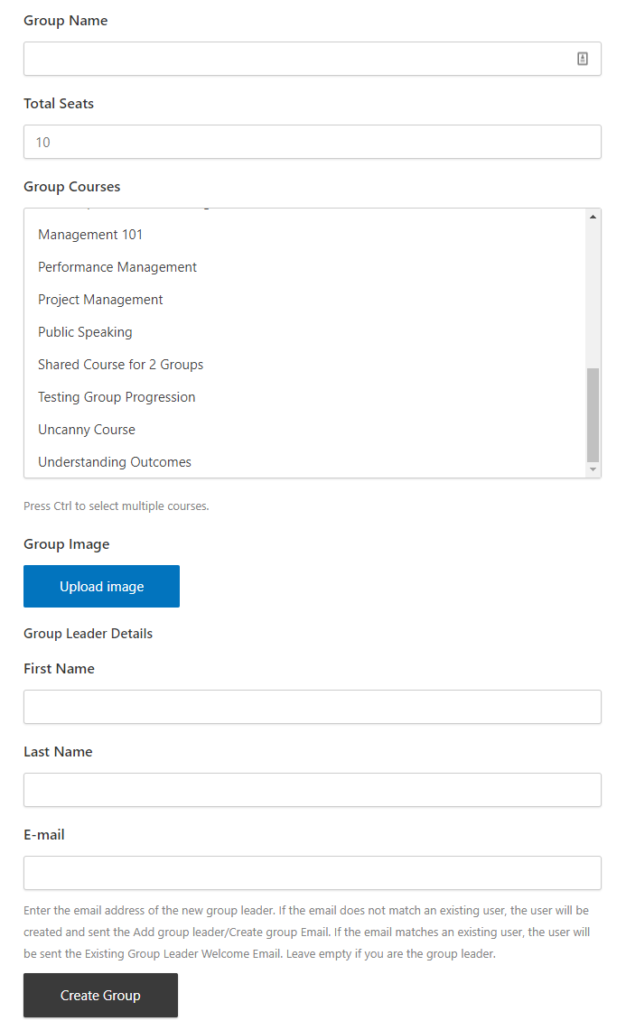
When a Group Leader or Administrator visits that page, they will see the same group creation form available under Uncanny Groups > Create Group in the admin.
Shortcode Attributes
Both attributes are optional. Both limit which courses appear in the form’s course selector — category filters by the standard WordPress Category taxonomy and course_category filters by the LearnDash Course Category taxonomy.
| Attribute | Description |
|---|---|
category | A category slug (or comma-separated list of slugs) using the standard WordPress Category taxonomy that limits the courses available to assign to the group. |
course_category | A category slug (or comma-separated list of slugs) using the LearnDash Course Category taxonomy that limits the courses available to assign to the group. |
Example — restrict to a single course category:
[uo_groups_create_group course_category="compliance-training"]Example — restrict to multiple course categories:
[uo_groups_create_group course_category="compliance-training,onboarding"]Leaving both attributes blank (or omitting them entirely) shows all available courses.
Required Fields
The person creating the group must complete all of the following:
- Group name — the display name for the group
- Total seats available — the number of learner seats in the group
- Courses — one or more courses to assign to the group
- Group leader email address — the email of the person who will manage the group
- Group leader first name
- Group leader last name
Optional Fields
- Parent Group — When the Group Hierarchy option is enabled (found on the page LearnDash LMS > Groups > Settings tab), a drop down selector will appear. This selector will list all available groups that can be assigned as the Parent Group in the hierarchy (making the created group a child in the hierarchy). By default, this option will be set to “No Parent”. If “No Parent” is selected, then the group created on form submission will not be assigned to a hierarchy.
- Group image — a cover image for the group. This image is used by the Uncanny Toolkit Pro Group Logo/List module for group branding on the front end.
What Happens After the Form Is Submitted
Once the form is submitted, the group is created immediately and becomes available for the assigned Group Leader to manage via their Group Management page.
Notification emails are sent automatically based on whether the Group Leader is a new or existing user:
- New user: An email is sent to the Group Leader containing their username and temporary password so they can log in and access the group.
- Existing user: The user receives a notification email and will see the new group the next time they log in.
Note: The group creation form is only visible to logged-in Group Leaders and Administrators. Other user roles — including standard learners — will not see the form.
Related Articles
- Uncanny Groups for LearnDash – Plugin Overview — Understand the full scope of what Uncanny Groups can do.
- Set Up Group Management Pages — Configure the front-end pages used for group management, including where to place this shortcode.
- Using the Group Management Page — What Group Leaders can do after a group has been created.
- Manage Groups as Administrator — How administrators create and configure groups from the WordPress admin.
- Set Up User Enrollment — Configure how learners are enrolled into groups after creation.
Is there the ability to import groups via a spreadsheet upload?
We’re afraid there is not. It may be something we add in future though (and we have an internal tool for it), so for now we’ll track this as a feature request.