
Overview
Uncanny Groups for LearnDash sends automated emails at key moments in the group lifecycle — when users are invited, enrollment keys are distributed, and group leaders are assigned. This article explains how to customize those email templates, personalize messages with dynamic variables, and make sure your emails actually reach learners.
Before you start
- You need Administrator access to your WordPress site.
- Navigate to Uncanny Groups > Settings > Email Settings to access all the options below.
- If you have high learner volumes, set up a transactional email service before testing (see Deliverability below).
Global sender settings
At the top of the Email Settings tab, configure the details that appear on every group email sent by the plugin:
| Setting | What it does |
|---|---|
| From Email | The email address that appears in the “From” field |
| From Name | The display name shown alongside the From address |
| Reply To | Where replies are directed (can differ from From Email) |
These settings apply globally to all group email templates. To change the underlying WordPress sender defaults, use a plugin such as Change Mail Sender.
You can also disable any template by unchecking the checkbox next to it. Disabling a template suppresses that email entirely and, in some cases, removes the related action from the Group Management interface (see template details below).
Group Specific Emails
While there are 5 global email templates, there are also 3 email templates available for individual groups. Admins can enable and edit individual group emails for Add and invite (new user), Add and invite (existing user) and Send enrollment key.
When any of these 3 emails are enabled on the group edit page (found in the Uncanny Groups tab), they will override the email sent to users for the group they are associated with.
Email variables
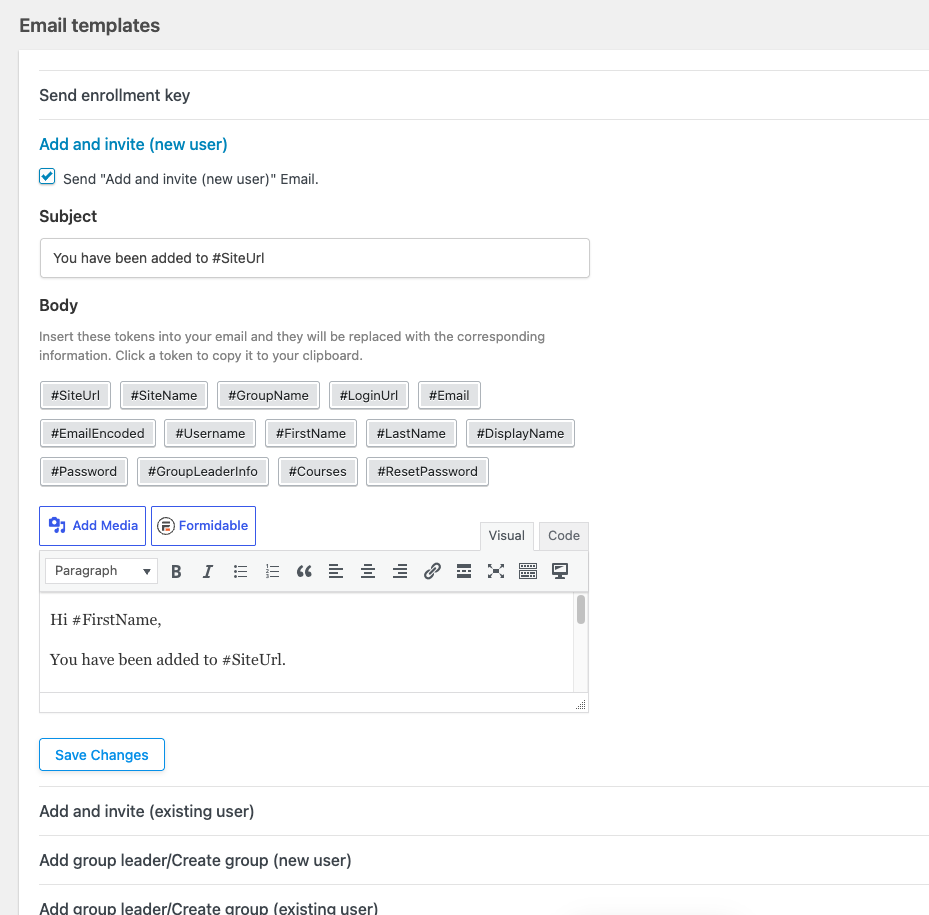
All templates support dynamic variables that pull data from the user’s profile, the group, and your site. Insert any of the following tokens directly into the subject line or body of a template:
| Variable | Inserts |
|---|---|
#SiteUrl | Your website address |
#LoginUrl | Your site’s login page URL |
#RedemptionKey | The enrollment key for group registration |
#Email | The user’s email address |
#EmailEncoded | The user’s email address, URL-encoded |
#Username | The user’s WordPress username |
#FirstName | The user’s first name |
#LastName | The user’s last name |
#DisplayName | The user’s display name |
#Password | The auto-generated password for new user registrations |
#SiteName | Your site name |
#GroupName | The name of the group the user is being added to |
#Courses | The list of courses assigned to the group |
#GroupLeaderInfo | The names and email addresses of the group’s leaders |
Email templates
The plugin includes six built-in templates. Each fires at a specific point in the group workflow.
Add and Invite (New User)
When it sends: A Group Leader uses Add and Invite for an email address not yet registered on your site.
The plugin automatically creates a WordPress account for the user and adds them to the LearnDash group. Because the password is system-generated, include #Password in this template — or replace it with a password-reset link — so the new user can log in.
Add and Invite (Existing User)
When it sends: A Group Leader invites a user who already has a WordPress account but is not yet a member of the current group.
Tip: If you disable both invitation emails (new and existing user), the Add and Invite User button label in the Group Management interface changes to Add User.
Send Enrollment Key
When it sends: A Group Leader selects Send Enrollment Key for one or more users.
Unlike the invitation emails, this template does not register the user automatically. The user must visit your registration page and enter their key. Your template must include clear instructions plus the #RedemptionKey variable — and either #SiteUrl or #LoginUrl so users know where to go.
Note: Disabling this template removes the Send Enrollment Key option from the Add User dialog entirely.
Add Group Leader / Create Group (New User)
When it sends: An admin clicks Add Group Leader for an unregistered email, or uses Uncanny Groups > Create Group with an email address not yet on the site.
The plugin registers the new user and assigns them the Group Leader role. Include #Password or a reset link in this template.
Add Group Leader / Create Group (Existing User)
When it sends: Adding a Group Leader or creating a group when the email address is already registered on the site.
New Group Purchase
When it sends: A user completes a group license purchase through WooCommerce.
Use this template to confirm the purchase, summarize what was purchased, and link to the Group Management page. Including #GroupName and #Courses gives buyers an immediate overview of what they have access to.
Deliverability
The plugin can send a large number of emails as your learner base grows. To protect deliverability and avoid messages being flagged as spam, we recommend routing all plugin email through a transactional email service such as SparkPost, SendGrid, or Postmark. Configure your chosen service at the WordPress level (via its plugin or SMTP settings) and all group emails will route through it automatically.
Critical: test before you launch
Important: In most cases, a group email cannot be re-triggered once it has been sent. Build your templates carefully, insert all required variables, and send test messages before adding real learners to any group.
Related Articles
- Install and Set Up Uncanny Groups — complete first-time configuration guide
- Set Up Group Management Pages — configure the front-end pages Group Leaders use
- Manage LearnDash Groups as a WordPress Administrator — create groups, assign seats, and manage enrollment
- Set Up User Enrollment — enrollment key and invitation options in detail
- Frequently Asked Questions — common setup and troubleshooting answers