
Overview
The Group Management page is the front-end hub where Group Leaders manage their groups — adding and removing users, distributing enrollment keys, resetting passwords, and emailing members — without needing WordPress admin access.
When the Uncanny Groups for LearnDash plugin is activated, it automatically creates a Group Management page built with the Group Management block (equivalently, the [uo_groups] shortcode). Group Leaders are redirected to this page after login and can also reach it via any [uo_groups_link] or [uo_groups_button] shortcode you place in your theme navigation.
Access is restricted to users with the Group Leader role. While Administrators can also view and edit groups via the Group Management page, the Group Management page was designed for Group Leaders to use.
Tip: Before customizing the page, review Set Up Group Management Pages for instructions on renaming, configuring shortcode attributes, and adding pages to your site menu.
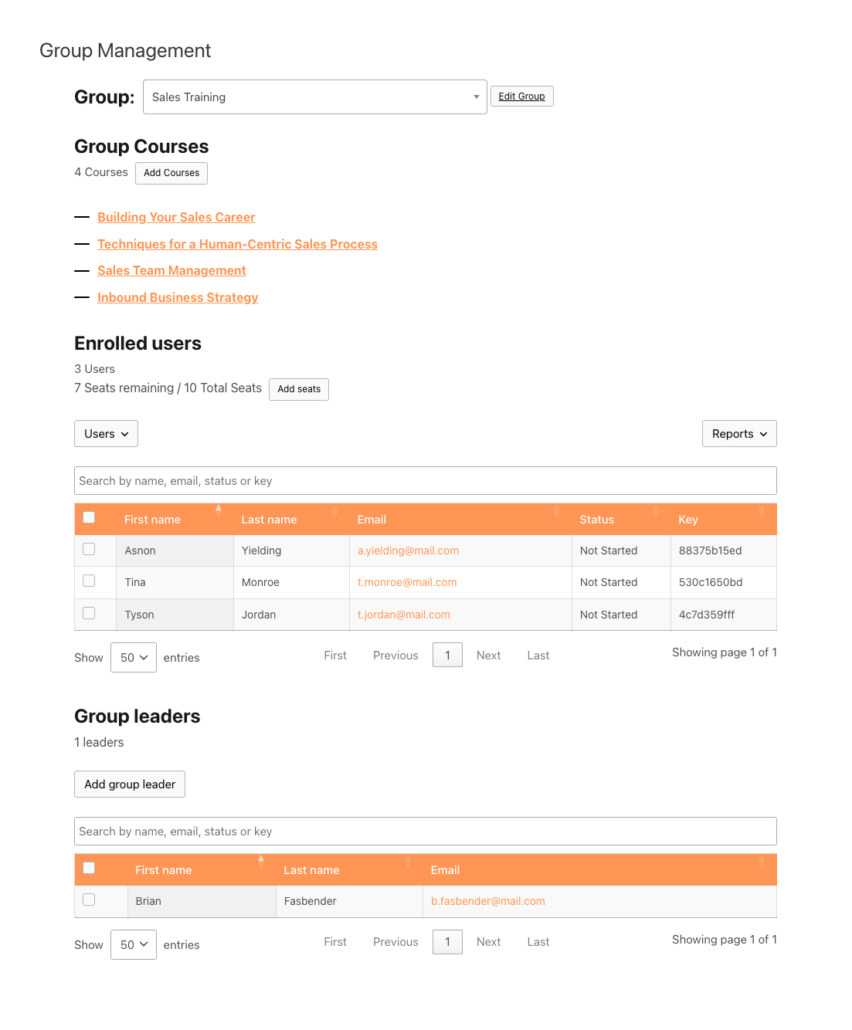
Group information
At the top of the page, Group Leaders see a summary of the selected group:
- Group name selector — a dropdown listing every group the leader manages. If they manage only one group, the dropdown is hidden and the single group name is displayed.
- Seats remaining / Total seats — displays available seats alongside the total seat allocation for the group. Seats are consumed the moment a user is enrolled (not on invitation), and remain occupied regardless of course completion status.
- Associated courses — links to each course assigned to the group, so leaders can quickly navigate to course content.
When child group reporting is enabled in the plugin settings, parent groups display combined seat and user data rolled up from all child groups.
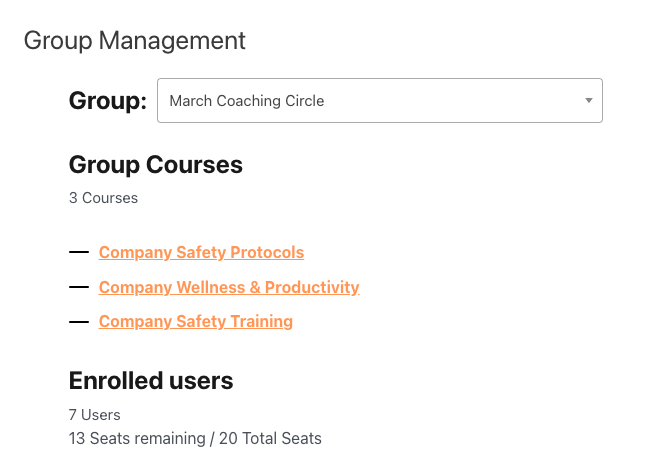
Enrolled users
The Enrolled Users table lists every user currently associated with the group. For each user you can see:
- Display name (linked to the user edit dialog when Allow group leaders to edit users is enabled in settings)
- Email address
- Enrollment status (see User status reference below)
- Enrollment key used (if applicable), controlled by the
key_columnshortcode attribute
User status reference
| Status | Meaning | Enrollment key status |
|---|---|---|
| Not Enrolled | User received an invitation or key but has not yet redeemed it | Available |
| Not Started | User is enrolled in the group but has not begun any course | Available |
| In Progress | User has started at least one course | Used |
| Completed | User has completed all courses assigned to the group | Used |
Adding users
Group Leaders can add users to a group in three ways, depending on which buttons are enabled via shortcode attributes:
Invite a single user
- Click the Users button.
- Select Add one. A form appears with two options, Add and invite user and Send enrollment key (see Send enrollment keys section below). Check Add and invite user.
- Enter the user’s first name, last name, email address and optional password.
- Click Add User. An email is sent to the user based on the email message settings set up by your Administrator. The user is added to the list of users in the group and they take up a seat in your group, and their status is set to Not Started. If you add a user that already exists on the site, the system will automatically assign a key, add them to the group and send the Add and invite (existing user) email. They then occupy a seat in the group just like a new user.
Invite Multiple users
- Click the Users button
- Select the Add multiple option. The Bulk Add & Invite Users form appears.
- Enter the user’s first name, last name, email address and optional password.
- Click the Add & Invite Users button. The same process will occur as outlined in step 4 of Invite a single user (see above)
Send enrollment keys
Group Leaders can add users to their group by sending them an enrollment key which requires the user redeem the key to be added to the group. If the user is not registered on the site, then they would need to redeem the enrollment key via registration (see Set Up User Enrollment for more info) .
- Click the Users button
- Select Add one. Select the option Send enrollment key
- Enter the user’s first name, last name, email address (there is no password field when Send enrollment key is selected
- Click Add User.
- Users will receive the Send enrollment key email. Once that user registers and redeems that key, they take up a seat in the group, are enrolled in the group and can begin group courses.
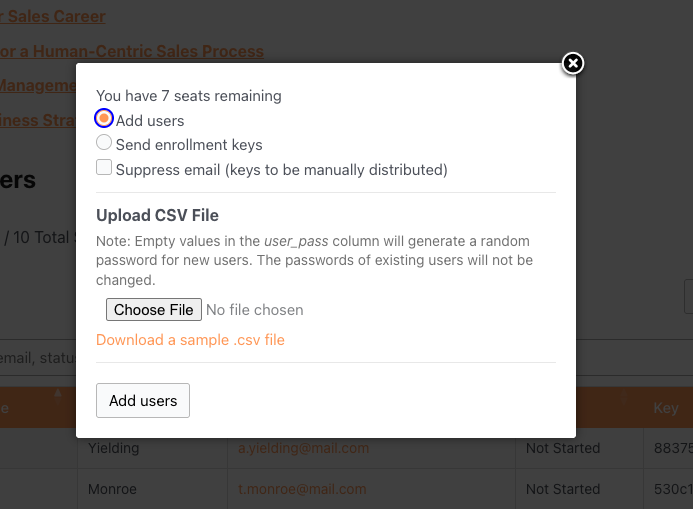
Bulk upload via CSV
To add many users at once, upload a CSV file:
- Click Upload Users.
- Prepare your CSV file using the following column format (the first row is a header row of column names):
user_email,user_pass,first_name,last_name- Select the file and click Upload. The plugin creates new WordPress user accounts for any email addresses not already in the system, enrolls all users in the group, and sends invitation emails.
Note: For the bulk upload to work properly, a CSV file formatted with the following column order and headings must be used: user_email; user_pass; first_name; last_name. CSV files that have incorrect formatting of email addresses, column names, etc will not be uploaded. You can download a sample file from the Upload Users modal box. If the user_pass cells are blank, a random password will be used, but the column heading should still be included. A column for “username” can optionally be included as the first column but is not required; if it exists but is left blank, username will default to the email address.
Removing users
To remove users from a group, select the users you would like to remove from the Enrolled User list, and a Remove User(s) button will appear. Click on the Remove User(s) button. You will be prompted to confirm your action.
Whether or not a Group Leader can remove users from the group, depends on the users group status:
- Always — Group Leaders can remove users at any stage.
- Before course enrollment begins — Leaders can only remove users who have not yet started any course.
- Before course completion — Leaders can remove users until they complete all group courses.
Depending on the options set by your site administrator, you may only be able to remove group members before they have enrolled and begun their courses. Once a learner has begun completing the courses that are available in the group, or if they have completed all of the courses and their status is set to Completed, it may no longer be possible to remove them from the group.
Note: Removing a user from a group un-enrolls them from the group’s courses. The seat they occupied becomes available again.
Password resets
If a user has forgotten their password, a Group Leader can trigger a reset without accessing the WordPress back end:
- Locate and select the user in the Enrolled Users table. A Send password reset button will appear.
- Click the Send password reset
- The user will be emailed a link to reset their password.
Downloading enrollment keys
Group Leaders can download a CSV of all unassigned enrollment keys for the group — useful for distributing keys manually or tracking redemptions in a spreadsheet.
Click Users > Download Keys to export a CSV file containing each unused key and its status.
This button is shown or hidden via the download_keys_button shortcode or block settings attribute.
Emailing group members
Group Leaders can easily email all members of their group based on their course status (Not enrolled, Not started, In progress and/or Completed). Clicking Users > Email Users brings up the email group members interface.
Emails sent via this interface use the Group Leader’s name as the From Name, the Group Leader’s email address as the Reply-to Email, and the From Email address in Uncanny Groups > Settings as the From Email. This is to reduce the likelihood that the emails are flagged as spam. Members are sent the email via BCC, so group members will not see each others’ email addresses.
Note that this feature is not available by default. On your Group Management page, you must add the group_email_button=”show” attribute to your [uo_groups] shortcode to display the button to Group Leaders.
For full details on composing and customizing group emails, see Configure Group Emails.
Note: The group_email_button attribute defaults to "hide". You must explicitly set it to "show" to expose this feature to Group Leaders.
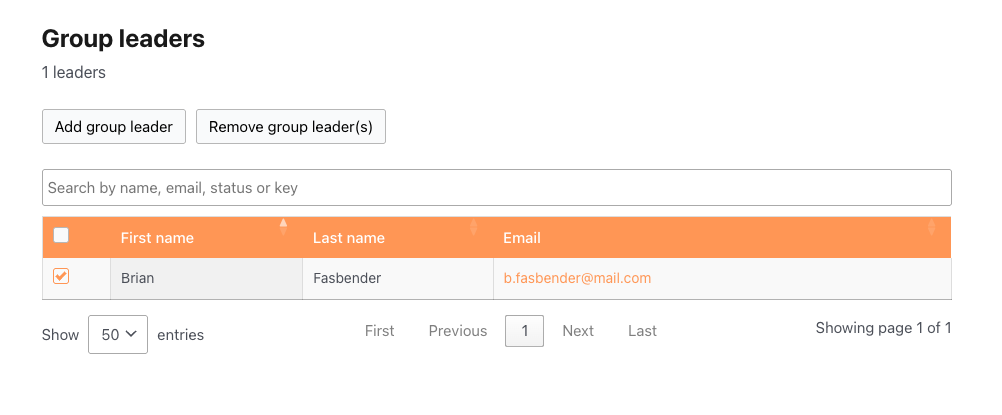
Group Leader management
The Group Leaders section (shown when group_leader_section="show") lets an existing Group Leader:
- Add a Group Leader — enter a user’s email address to grant them Group Leader status for this group. The button is controlled by
add_group_leader_button. - Remove a Group Leader — click the remove icon next to any leader’s name. Group Leaders cannot remove themselves from the list.
Adding seats and courses
If the group was purchased through WooCommerce (as a subscription or group license), Group Leaders may see Add Seats and Add Courses buttons, depending on the purchase model:
- Add Seats — increases the seat count for the group (only appears for groups created via the purchase of a Custom Group License.
- Add Courses — adds additional courses to the group’s curriculum.
Individual seats that have already been used cannot be refunded or removed. For full details on expanding groups after purchase, see Add Seats and Courses after Purchase.
These buttons are controlled by the add_seats_button and add_courses_button shortcode attributes.
Shortcode reference
The Group Management block and [uo_groups] shortcode have the following settings / attributes to control which features are visible on the page:
| Setting / Attribute | Values | Default | Controls |
|---|---|---|---|
group_name_selector | "show" / "hide" | "show" | Group name dropdown |
seats_quantity | "show" / "hide" | "show" | Seat count display |
add_seats_button | "show" / "hide" | "show" | Add Seats button |
add_courses_button | "show" / "hide" | "show" | Add Courses button |
add_user_button | "show" / "hide" | "show" | Add User / invite button |
remove_user_button | "show" / "hide" | "show" | Remove User button |
first_last_name_required | "yes" / "no" | "no" | Makes first/last name mandatory when adding a user |
group_email_button | "show" / "hide" | "hide" | Send Email button |
upload_users_button | "show" / "hide" | "show" | Bulk CSV upload button |
download_keys_button | "show" / "hide" | "show" | Download Keys button |
key_options | "show" / "hide" | "show" | Enrollment key options in the Add User dialog |
key_column | "show" / "hide" | "show" | Key column in the Enrolled Users table |
group_courses_section | "show" / "hide" | "show" | Associated courses list |
group_leader_section | "show" / "hide" | "show" | Group Leaders section |
add_group_leader_button | "show" / "hide" | "show" | Add Group Leader button |
quiz_report_button | "show" / "hide" | "show" | Quiz Report button |
assignments_button | "show" / "hide" | "show" | Assignments button |
essays_button | "show" / "hide" | "show" | Essays button |
progress_report_button | "show" / "hide" | "show" | Progress Report button |
progress_management_report_button | "show" / "hide" | "show" | Manage Progress button |
csv_export_button | "show" / "hide" | "show" | CSV export of enrolled users |
excel_export_button | "show" / "hide" | "hide" | Excel export of enrolled users |
enrolled_users_page_length | numeric | 50 | Default rows per page in the Enrolled Users table |
enrolled_users_length_menu | comma-separated list | 25,50,100,-1 : All | Row-count options in the Enrolled Users table |
group_leaders_page_length | numeric | 50 | Default rows per page in the Group Leaders table |
group_leaders_length_menu | comma-separated list | 25,50,100,-1 : All | Row-count options in the Group Leaders table |
enrolled_users_orderby_column | column name | First name | Column used to sort the Enrolled Users table |
enrolled_users_order_column | "asc" / "desc" | "asc" | Sort direction for the Enrolled Users table |
group_leaders_orderby_column | column name | First name | Column used to sort the Group Leaders table |
group_leaders_order_column | "asc" / "desc" | "asc" | Sort direction for the Group Leaders table |
edit_page_id | page ID | (none) | ID of a custom user-edit page |
edit_url | relative URL | (none) | URL of a custom user-edit page (alternative to edit_page_id) |
Example — showing the email button and hiding key management:
[uo_groups group_email_button="show" key_column="hide" key_options="hide"]Related Articles
- Set Up Group Management Pages — Configure which pages the plugin creates and customize their shortcode attributes
- Using the Group Reports — Course and quiz reporting available from the front-end Reports menu
- Configure Group Emails — Customize invitation, key, and leader email templates
- Set Up User Enrollment — Control how users are enrolled in groups and courses
- Add Seats and Courses after Purchase — Expand existing groups created through WooCommerce purchases