
New to Uncanny Groups? This guide takes you from a fresh install to a fully working group — with learners enrolled and progress reports running — in about 15 minutes. No coding, and no need to give anyone access to your WordPress dashboard.
Looking for the bigger picture first? The Uncanny Groups – START HERE! article explains the three ways to use Groups (manual, selling custom licenses, and selling pre-configured licenses). This guide walks through the manual path — the fastest way to see Groups in action.
What Uncanny Groups does
LearnDash includes a basic “Groups” feature, but it lives entirely in the WordPress admin and offers little more than bulk enrollment. Uncanny Groups turns that into a complete team-training toolkit:
- Group Leaders manage their own people from a clean front-end page — no WordPress admin access required.
- Seats and enrollment keys let leaders add, invite, and remove learners without your involvement.
- Built-in reports show course and quiz progress for the whole group at a glance.
- WooCommerce integration (optional) lets you sell group licenses, so organizations buy seats and self-manage from there.
This guide covers the essentials so you can see the value immediately. Links throughout point to deeper articles when you’re ready.
Key terms (read this first)
A few words appear constantly in Groups. Here’s what they mean:
| Term | Plain-English meaning |
|---|---|
| Group | A set of learners enrolled in the same course(s) — e.g. “Acme Corp – Onboarding 2026”. |
| Group Leader | A person who manages a group from the front end (adds learners, views reports). Usually a manager, trainer, or client contact. |
| Seat | One spot in a group. A 25-seat group can hold 25 learners. |
| Enrollment key | A code that enrolls one learner into a group. Leaders hand these out or send invites; keys are used as learners join. |
| License | A purchasable bundle of seats + course(s), used when you sell group access through WooCommerce. |
What you’ll need
- A working WordPress site with LearnDash and at least one published course.
- The Uncanny Groups plugin file and your license key (both are in your purchase email and your Uncanny Owl account).
Step 1 — Install and activate
- In your WordPress dashboard, go to Plugins > Add New > Upload Plugin.
- Upload the Uncanny Groups ZIP file and click Install Now, then Activate.
- When prompted, open the License Activation screen and paste your license key. Activation enables automatic updates.
On activation, the plugin automatically creates the front-end pages it needs (Group Management, registration, and reports) and sets up default email templates — so you’re ready to go without building anything by hand.
For the full install walkthrough, see Install and Set Up Uncanny Groups.
Step 2 — Create your first group
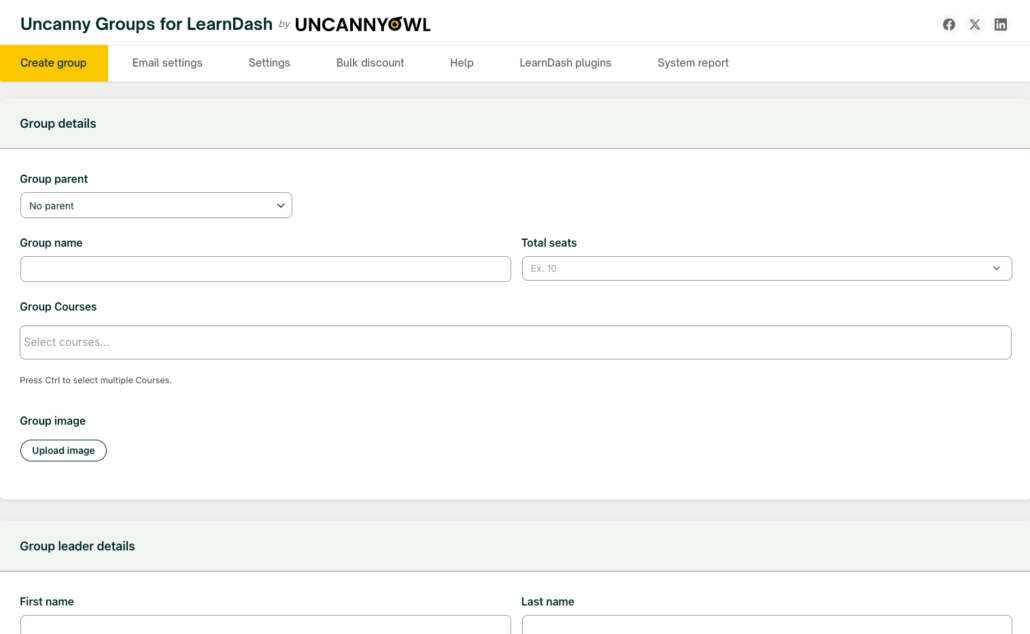
You can create a group in two ways, with the Uncanny Group Creation Wizard or by creating and upgrading an LearnDash group. For your first time, the Uncanny Group Creation Wizard is fatsest:
- Go to Uncanny Groups > Create Group to launch the Uncanny Group Creation Wizard.
- Fill out the Group details section by adding a Group name, the Total seats you want the group to have (each seat can be assigned to a single user), Group Courses and if desired a Group image. If group hierarchy is enabled in LearnDash group options, then you can also assign a Parent group.
- You can also assign an existing user as the Group Leader or create a new Group Leader user by filling out the First name, Last name and E-mail fields under the Group leader details section.
- Click the Create group button to create a new upgraded group.
Already have native LearnDash groups? You can upgrade existing or new LearnDash groups to unlock the Uncanny front-end features. See Upgrade Existing LearnDash Groups.
Step 3 — Add and invite learners
This is where Group Leaders do most of their work. From the front-end Group Management page, a leader can:
- Add and invite a user — creates the account and emails them an invitation.
- Send an enrollment key — emails a code an existing user can redeem.
- Bulk add multiple users at once, or upload a CSV for large groups.
The CSV format is simple: user_email,user_pass,first_name,last_name.
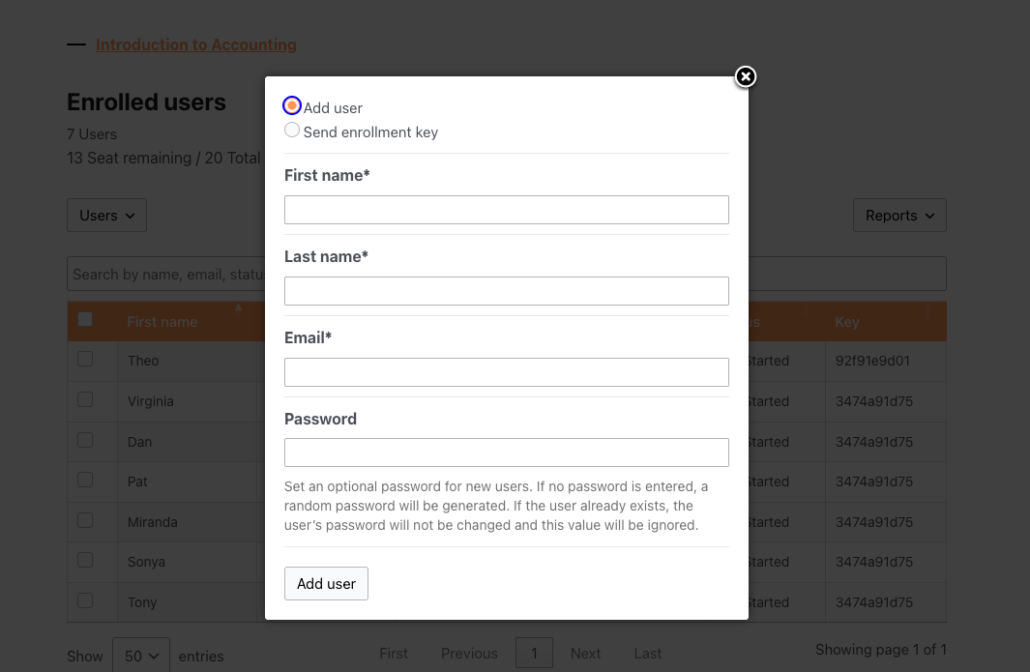
As learners join, seats fill up and enrollment keys are marked used. Leaders always see how many seats remain at the top of the page. Full details: Using the Group Management Page.
Step 4 — Watch progress with reports
Once learners start, Group Leaders can track everyone from the same front-end page.
- Review each learner’s group progress status — Not started, In progress, or Completed.
- To view group reports, click the Reports button. A dropdown list of all enabled reports will appear (reports are enabled on the page Uncanny Groups > Settings under the heading Page Setup – follow details on that page for setting up report pages) .
- Click the Course option to view the Course Report where you can view group members course progress by selecting a group (if your the leader of more than one group) and course assigned to the selected group.
- Click the Quiz option to view the Quiz Report for scores, and export any report to CSV.
- Click the Progress option to view the Progress Report for individual user progress in all group courses.
- Click the Assignments option to view the Assignment Report to manage uploaded LearnDash assignments in the front end.
- Click the Essays option to view the Essay Report to manage essay question answers from LearnDash quizzes in the front end.
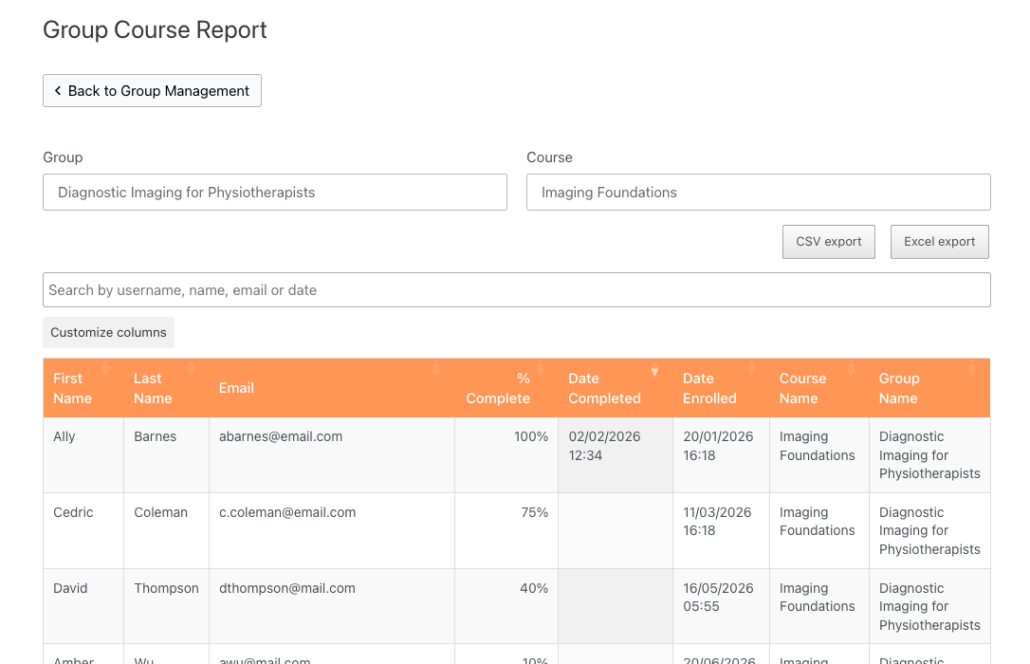
That’s it — you now have a working group, enrolled learners, and live reporting that your Group Leaders can run on their own. See Using the Group Reports for everything reports can do.
Note: Non-upgraded LearnDash groups can still be viewed on the Group Management page by Group Leaders. Just enable the option”Show “basic” (non-upgraded) groups in front end with access to reports only” on the Uncanny Groups > Settings page (found under the heading “General”. These groups will only have reporting functions, Group Leaders cannot add/remove members of “Basic” groups.
Where to go next
Pick the path that matches your goal:
- Want to sell course access to organizations? Start with Sell LearnDash Group Access to Learners and Set up LearnDash Group Course Products.
- Want leaders to buy and build their own licenses? See Enable Users to Build Custom Group Licenses.
- Training your own team? Read Onboard & Train Your Team with LearnDash Groups.
- Customizing emails or behavior? See Configure Group Emails and Actions/Filters for Developers.
Related Articles
- Uncanny Groups – START HERE! — choose the right setup for your goal
- Install and Set Up Uncanny Groups — full installation and settings reference
- Using the Group Management Page — the Group Leader’s command center
- Frequently Asked Questions — quick answers to common setup questions