Overview
Out of the box, WordPress sends your learners to a generic wp-login.php screen that has nothing to do with your brand. For a course or membership site, that’s a jarring break in the experience — and a missed opportunity to reinforce trust at the exact moment someone signs in.
The Uncanny Toolkit lets you replace that default screen entirely with a login experience that lives on your own pages, matches your design, and routes learners exactly where you want them. This guide combines four free modules into one cohesive flow.
The Modules You’ll Use
| Module | Role in the flow |
|---|---|
| Front End Login | The branded login, forgot-password, and reset-password forms |
| Log In/Log Out Links | Login, logout, and register links in your menu |
| Log In/Log Out Redirects | Sends users to the right page after signing in or out |
| Menu Item Visibility | Shows the right menu items to logged-in vs logged-out visitors |
Enable all four under Uncanny Toolkit > Modules.
The Workflow
Step 1: Create Your Branded Login Page
- Create a new page called Log In.
- Add the Front End Login block (or the [uo_login_ui] shortcode) to the page.
- Go to Uncanny Toolkit > Settings > Front End Login and set this page as your Login Page. Anyone who tries to reach the default WordPress login screen is now redirected here.
- Under Select Template, choose Modern and use the built-in colour pickers (Primary, Text, Background, and Border Color) to match your brand — no custom CSS required.
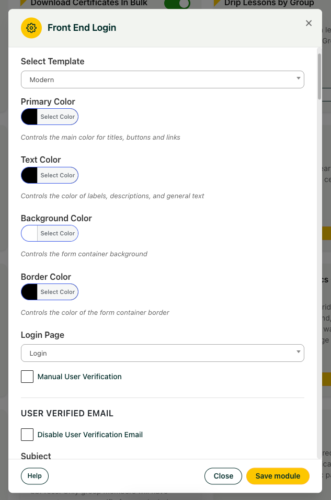
Tip: Add reCAPTCHA v2 keys in the Front End Login settings to cut down on spam logins, and — if your audience expects it — turn on two-factor authentication via the free WP 2FA plugin.
Step 2: Route Users After They Log In
Use the Log In/Log Out Redirects module to send learners to a meaningful destination — typically a My Courses dashboard — instead of the WordPress profile screen.
- Go to Uncanny Toolkit > Settings > Log In/Log Out Redirects.
- Set the login redirect to your course dashboard page.
- Set the logout redirect to your home page or a “see you soon” page.
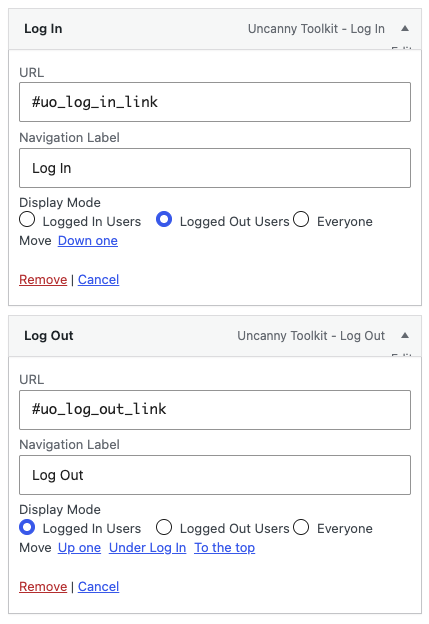
Step 3: Add Login and Logout Links to Your Menu
With Log In/Log Out Links enabled:
- Go to Appearance > Menus.
- In the Uncanny Menu Links section, add a Log In link (or a modal login link) and a Log Out link.
For a smoother experience, use the modal login option so visitors can sign in from any page without leaving it. (The modal requires AJAX to be enabled in the Front End Login settings.)
Step 4: Show the Right Menu to the Right Visitor
A logged-out visitor shouldn’t see “Log Out,” and a logged-in learner shouldn’t see “Log In” or “Register.” Use Menu Item Visibility to clean this up:
- Go to Appearance > Menus and expand a menu item.
- Set each item to show only to logged-in or logged-out visitors as appropriate.
The Result
Visitors now experience a login flow that feels native to your site from start to finish: they click Log In in your menu, sign in on a branded page, and land on their course dashboard — never seeing a default WordPress screen. Logged-in and logged-out visitors each see a menu tailored to them.
Recommended Enhancements
- Distraction-free learning — Pair this with Hide Admin Bar so students don’t see the WordPress toolbar. See Use Case: A Distraction-Free Student Dashboard.
- Gated content — Use Show or Hide Content to reveal members-only content on otherwise public pages.
- Sales routing — Use Not Enrolled Redirect to send non-enrolled visitors to your sales page.