New to Tin Canny? This guide takes you from a fresh install to your first tracked eLearning module — with real completion and quiz data flowing into your reports — in about 20 minutes. No coding, and no external Learning Record Store to configure.
Want the bigger picture first? The Tin Canny Reporting for LearnDash – Overview article explains everything the plugin does. This guide walks the fastest path to seeing it work.
What Tin Canny does
LearnDash tells you whether a learner finished a lesson. It can’t tell you what happened inside an Articulate, Captivate, or iSpring module — how they scored, which questions they missed, or how long they spent. Tin Canny closes that gap:
- Upload eLearning modules (SCORM or xAPI/Tin Can) straight into your LearnDash lessons and topics — no separate hosting.
- Capture every interaction in a Learning Record Store (LRS) that’s built into your WordPress site.
- Report on real engagement through four admin reports plus front-end reports your Group Leaders can run themselves.
- Gate completion so a lesson and/or topic can’t be marked complete until the learner actually finishes the module.
This guide covers the essentials so you see value immediately. Links throughout point to deeper articles when you’re ready.
Key terms (read this first)
A few terms come up constantly in Tin Canny. Here’s what they mean:
| Term | Plain-English meaning |
|---|---|
| Module | A self-contained eLearning package (a SCORM or xAPI zip) built in a tool like Storyline, Rise, Captivate, or iSpring. |
| SCORM / xAPI (Tin Can) | The two publishing standards modules use to report progress and scores. Tin Canny supports both. |
| LRS (Learning Record Store) | Where learning data is stored. Tin Canny includes one inside WordPress, so you don’t need an external service. |
| Statement | A single recorded action — “Jane answered Question 3 correctly,” “Sam completed the module.” |
| Report | A view of the captured data: by course, by user, by raw statement, or by quiz question. |
What you’ll need
- A working WordPress site with LearnDash and at least one published course with a lesson or topic.
- The Tin Canny Reporting plugin file and your license key (both are in your purchase email and your Uncanny Owl account).
- At least one eLearning module exported as a SCORM or xAPI zip. See Authoring Tools Supported by Tin Canny for export tips.
- A server that meets the Technical Requirements.
Step 1 — Install and activate
- In your WordPress dashboard, go to Plugins > Add New > Upload Plugin.
- Upload the Tin Canny Reporting ZIP file and click Install Now, then Activate.
- Open Tin Canny Reporting > Settings and paste your license key. Activation enables automatic updates.
For the full walkthrough, see Install the Tin Canny Reporting Plugin.
Step 2 — Run Site Check
Before you upload anything, confirm your server can capture data.
- Go to Tin Canny Reporting > Settings and find the Site Check panel.
- Confirm the xAPI endpoint is reachable and that the plugin has direct access to its PHP files. Both should show green.
- If a check fails, click Re-check after adjusting your setup. The most common causes are Plain permalinks or a maintenance/redirect plugin intercepting requests.
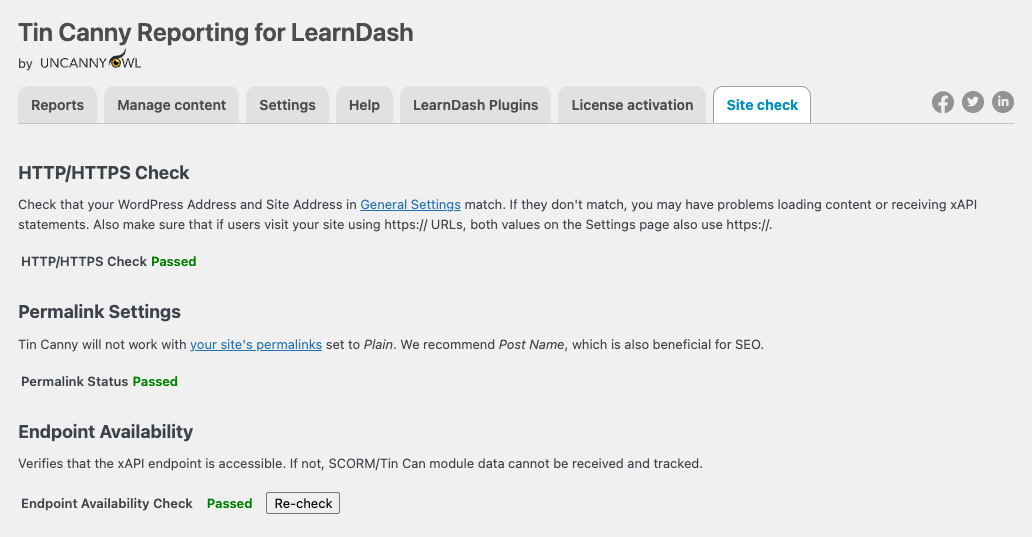
This 30-second step prevents the single most common support issue — modules that upload fine but never record data. Details: Site Check.
Step 3 — Upload your first module
- Edit the LearnDash lesson or topic where the module should live.
- In the editor, add the Tin Canny block (Gutenberg) or click the Tin Canny Uploader button (Classic Editor).
- Choose Upload new content, select your SCORM/xAPI zip, and wait for it to register.
- Insert the module into the page and Update the lesson.
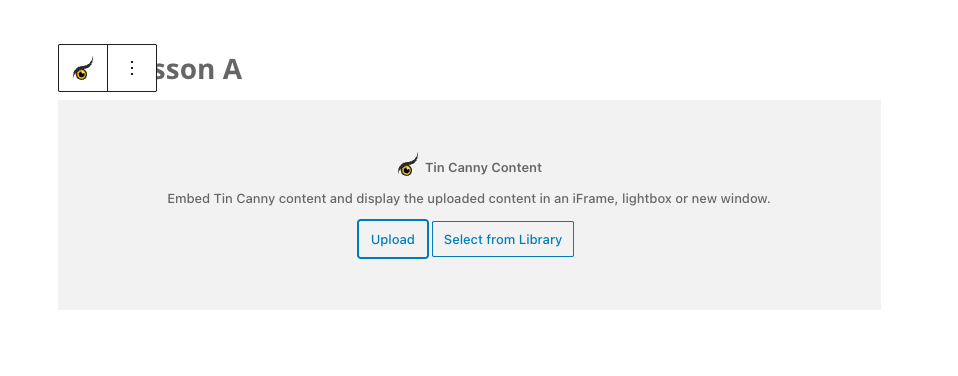
Every module you upload is also listed under Tin Canny Reporting > Manage Content,where you can search, preview, replace, or delete it. See Tin Canny Uploader and Managing eLearning Content.
Step 4 — Require the module for completion (optional but recommended)
To stop learners from skipping the module:
- While editing the lesson or topic, open the Tin Canny tab in the LearnDash tab bar at the top of the screen (next to Lesson page, Settings, and Uncanny Toolkit).
- Set Restrict Mark Complete to Disabled until complete so the page can only be completed once the embedded module reports completion. (Optionally set a Completion Condition such as
result > 80to require a passing score.) - Save.
Now the Mark Complete button stays locked until the learner finishes the module — so your completion data reflects real engagement, not just clicks.
Where are these settings? As of v5.1.3.3, all per-content Tin Canny module settings live in the Tin Canny tab on lesson and topic edit screens. See Setting up Tin Canny Reporting for the full list.
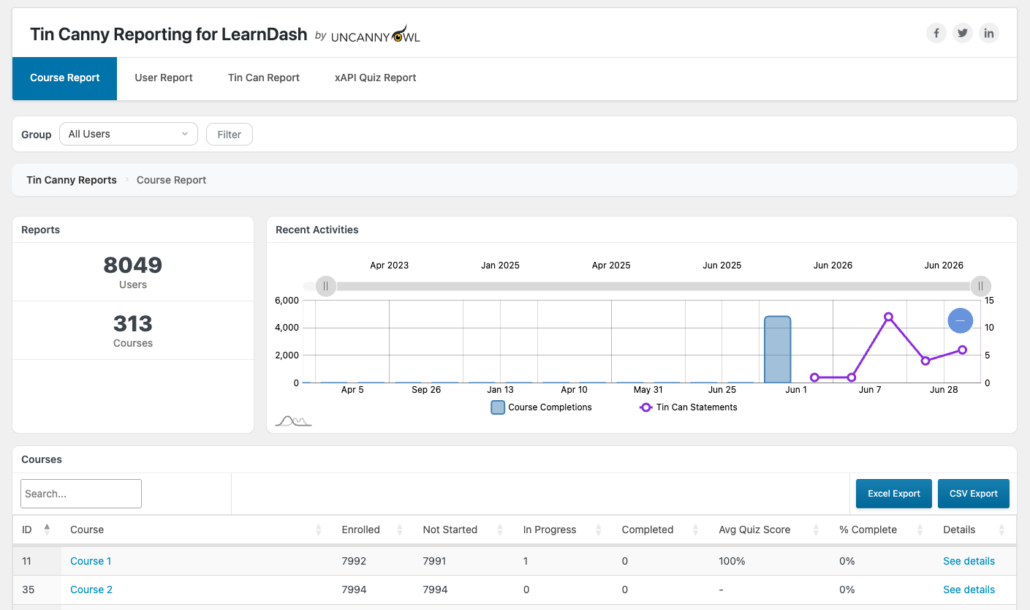
Step 5 — See your data in the reports
Take (or have a test learner take) the module, then:
- Go to Tin Canny Reporting > Reports.
- Open each report to see what it captures:
- Course Report — completion and activity across every course, with trend charts.
- User Report — drill into one learner: courses, lessons, quizzes, start and completion dates.
- Tin Can Report — the raw statement stream from your modules.
- xAPI Quiz Report — individual question responses, scores, and answer choices.
- Sort any column, search by name or email, and export to CSV/Excel for deeper analysis.
That’s it — you have a tracked module and live reporting. From here, learners’ scores, answers, and time-in-module flow into Tin Canny automatically.
Where to go next
Pick the path that matches your goal:
- Proving training happened? See Prove Training Compliance with Tin Canny.
- Want managers to run their own reports? See Front End LearnDash Reports and Give Managers Self-Serve Reporting.
- Embedding reports on pages? See the Tin Canny Shortcodes & Blocks Quick Reference.
- Fine-tuning behaviour? See Setting up Tin Canny Reporting and Actions/Filters for Developers.
Related Articles
- Tin Canny Reporting for LearnDash – Overview — everything the plugin does
- Install the Tin Canny Reporting Plugin — full installation reference
- Setting up Tin Canny Reporting — every setting explained
- Authoring Tools Supported by Tin Canny — exporting modules that track correctly