Generate codes
Creating a code batch is the very first step of the process of using codes. Once codes are generated, you can distribute, sell and control how they’re used.
To create a new batch of codes, navigate to Uncanny Codes > Generate codes as an administrator. The onscreen wizard will walk you through the code generation process.
Name your code batch
When multiple codes are generated with the same characters (e.g. 10 codes that can be redeemed for access to a LearnDash course), a “batch” of that group of codes is set up. Beginning with Uncanny Codes 4.0, all code batches must be named. The name makes it easier to identify code batches when setting up WooCommerce products and Uncanny Automator recipes.
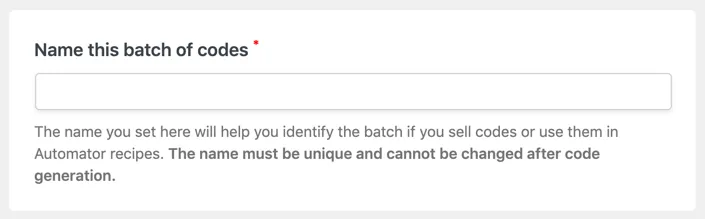
The name is a required field and must be filled in before you can generate codes. Use something that will be easy for you to recognize; it’s often helpful to figure out an appropriate naming convention before generating any codes. Names are unique and cannot be changed once codes are generated.
Code type
There are 2 types of codes available in Uncanny Codes: Uncanny Automator and LearnDash. For all code redemption types except LearnDash courses and groups, choose Uncanny Automator.
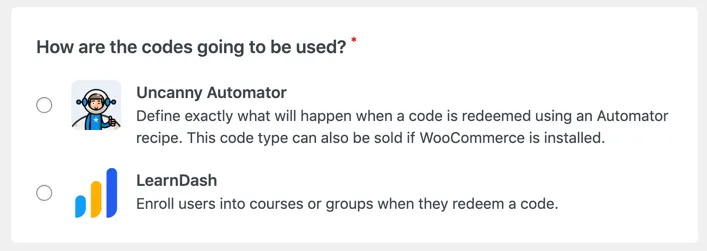
If you choose Uncanny Automator and don’t have it installed, you will have the option to install the free version automatically. This step is required before you can generate codes for use in Automator recipes. Uncanny Automator allows code redemption to be linked to any of the Actions for plugins and apps listed here, enabling code redemption to be linked to actions like adding a CRM tag, adding the user to a membership level, registering the user in a webinar, etc.
If you plan to sell codes with WooCommerce, choose Uncanny Automator.
For more information about setting up Automator recipes for generated codes, see this article.
LearnDash code types are very straightforward; they add the user who redeems the code to courses or groups in LearnDash.
LearnDash code settings
LearnDash code batches have additional settings that don’t apply to Automator codes. These settings allow mapping to LearnDash courses or groups right from the generation page and they define additional behaviours for ecommerce scenarios.
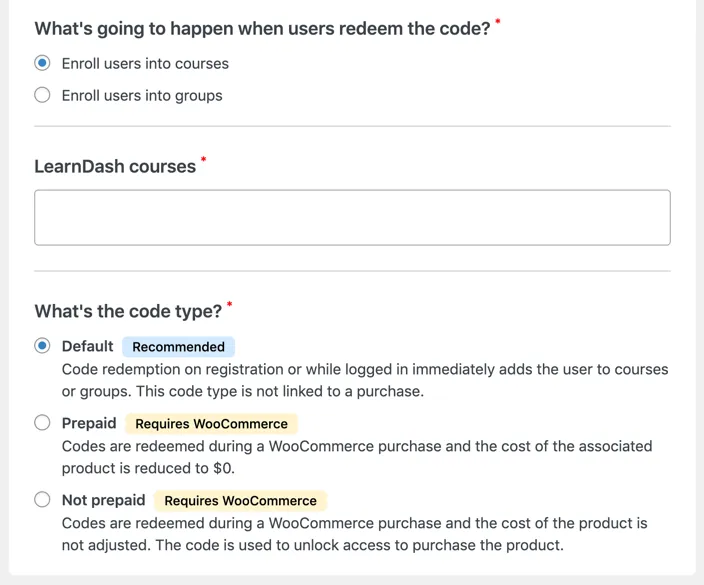
These are the additional settings for LearnDash codes:
- Enroll users into courses or groups: Codes can be generated for either LearnDash courses OR LearnDash groups. Once a selection is made, a list of available courses or groups is displayed. Select one or more courses or groups; users redeeming the generated code will be added to these courses or groups.
- LearnDash code type
- Default is the appropriate selection in most cases.
- Paid codes are used with WooCommerce to indicate that the associated code has been paid for previously; when redeemed as part of a purchase that includes a product that requires a LearnDash code (see this article), the price of the associated product is reduced to $0.
- Unpaid codes are also tied to WooCommerce transactions but charge the user the full amount.
Code settings

- Number of uses per code: Defines how many times a code can be redeemed. For situations where a code is only redeemed by one user, this should be “1”. For codes that will be shared among a group of users (such as a classroom or business department), this may be much higher. It’s not always practical to distribute individual codes, so this field allows control over how much a code can be shared. Important: If you plan to sell codes with WooCommerce, this value must be set to “1”.
- Expiry date/time (optional): If codes should expire, enter the expiry date and time.
Once the options above are set, codes can be automatically generated, or entered manually.
Auto-generate codes

Begin by choosing Auto-generate codes under Generation method. Then fill out the remaining fields:
- Number of unique codes: The number of unique codes to generate. This is how many codes the system will create when the Save Changes button is clicked. We recommend keeping this number under 10,000 and using separate batches if you need over 10,000.
- Number of characters: The number of characters to include in each code. We recommend no fewer than 8 characters and no more than 50.
- Type of characters: Check the type of characters you want included in each code.
- Dash separation: Divides the code into sections with hyphens to make them easier to read. They hyphens are not included in the Number of characters.
- Prefix/Suffix (optional): Setting a Prefix or Suffix can help to identify codes to users or to brand the codes.
Once generated, the batch of codes is added to the View Codes page of the plugin.
Manually entering codes
Custom codes can be entered instead of auto-generating codes. To do this, select Manually enter codes under Generation method. Doing this replaces the Number of unique codes, Number of characters, Dash separation, Prefix and Suffix fields above with a single textarea labeled Enter one code per line. Select the appropriate options and enter your custom codes one per line.
Codes support letters, numbers and hyphens.
Hi, we are evaluating Uncanny Codes plugin for a new internal product, and would like to ask if it is possible to add existing codes with a CSV file, so that we don’t need to enter all of them manually. Thanks in advance.
Hi Leonardo, not with a CSV file, but you can copy/paste into the code generation page.