Overview
While Uncanny Codes is often used alongside LearnDash for course and group enrollment, the plugin works just as well without LearnDash installed. By using Automator-type code batches paired with Uncanny Automator, you can create codes that trigger virtually any action on your WordPress site — from assigning user roles to adding members to BuddyBoss groups to tagging contacts in your CRM.
If you don’t use LearnDash, this article is your starting point. If you do use LearnDash but want codes to do more than just enroll users, this article is for you too.
How It Works
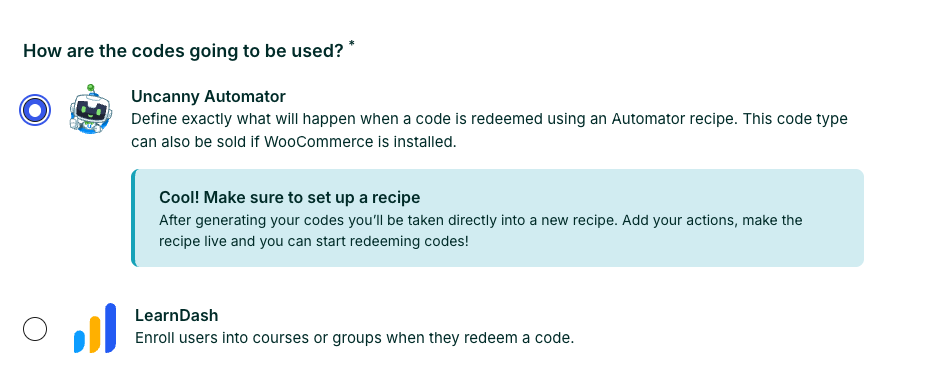
Uncanny Codes supports two types of code batches:
| Batch Type | What It Does | Requires LearnDash? |
|---|---|---|
| LearnDash | Directly enrolls users in LearnDash courses or groups on redemption | Yes |
| Automator | Fires an Uncanny Automator trigger on redemption — the Automator recipe determines what happens next | No |
Automator-type batches are the key to using Codes without LearnDash. When a user redeems a code from an Automator batch, the plugin fires a trigger in Uncanny Automator. You then build an Automator recipe that listens for that trigger and runs whatever actions you need — no LearnDash required.
Since Uncanny Automator connects to 200+ WordPress plugins and external services, the possibilities are extensive.
Prerequisites
- Uncanny Redemption Codes installed and activated
- Uncanny Automator installed and activated (Free or Pro)
- A redemption method set up (standalone shortcode, form plugin, or WooCommerce)
You do not need LearnDash or any other specific plugin installed — only the plugins relevant to the actions you want to trigger.
Step-by-Step Setup
1. Create an Automator-Type Code Batch
- Navigate to Uncanny Codes > Add New Batch
- Give your batch a name (e.g., “Premium Membership Codes”)
- Set the Code Type to Automator
- Configure the number of codes, format, and any expiration settings
- Click Generate Codes
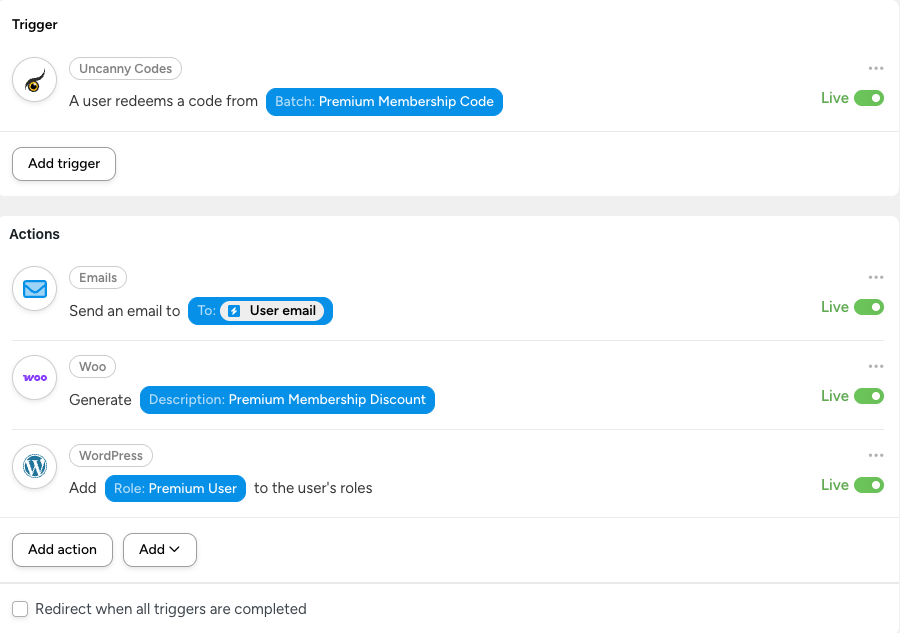
2. Build an Automator Recipe
- Navigate to Automator > Add New to create a new recipe
- Set the recipe type to Logged-in users (or Everyone if using Automator Pro and you want anonymous redemption)
- Add a trigger: Uncanny Codes > A user redeems a code from a batch
- Select the batch you just created
- Add one or more actions — see the examples below for ideas
- Set the recipe to Live
3. Set Up a Redemption Method
Choose how users will enter their codes:
- Standalone redemption page — Add the
[uo_user_redeem_code]shortcode to any page. Best for existing logged-in users. See Standalone Code Redemption. - Registration form — Add an Uncanny Code field to a Gravity Forms, WPForms, or Formidable Forms registration form. Best for new user registration. See Setting Up Code Redemption Forms.
- WooCommerce checkout — Enable the code field on the checkout page. Best when codes are tied to a product purchase. See Redeem Codes During WooCommerce Checkout.
4. Distribute and Test
Generate your codes, distribute them to users, and test the full flow: enter a code, verify the Automator recipe fires, and confirm the actions complete successfully.
Example Use Cases
Here are some common scenarios where Codes + Automator replaces what would otherwise require custom development or manual processes.
Assign a WordPress Role
Scenario: You sell premium memberships and want to upgrade a user’s role when they redeem a code.
Automator recipe:
- Trigger: A user redeems a code from the “Premium Membership” batch
- Action: WordPress > Change the user’s role to Subscriber/Editor/Custom Role
This is useful for membership sites, gated content areas, or any site where user roles control access.
Add to a BuddyBoss or BuddyPress Group
Scenario: You run a community site and want to grant group access via codes.
Automator recipe:
- Trigger: A user redeems a code from the “Community Access” batch
- Action: BuddyBoss > Add the user to a group
Tag a Contact in Your CRM
Scenario: You distribute codes at events and want to tag attendees in your CRM when they redeem.
Automator recipe:
- Trigger: A user redeems a code from the “Conference 2026” batch
- Action: ActiveCampaign/HubSpot/Mailchimp > Add a tag to the contact
Send a Custom Email
Scenario: You want to send a personalized welcome email with specific instructions when a code is redeemed.
Automator recipe:
- Trigger: A user redeems a code from any batch
- Action: Automator > Send an email to the user (with custom subject, body, and tokens for personalization)
Grant WooCommerce Product Access
Scenario: You want codes that unlock access to a downloadable product or subscription.
Automator recipe:
- Trigger: A user redeems a code from the “Product Unlock” batch
- Action: WooCommerce > Create an order for the user (or add them to a membership via WooCommerce Memberships)
Multi-Action Workflow
Scenario: A single code redemption should trigger several things at once.
Automator recipe:
- Trigger: A user redeems a code from the “Onboarding” batch
- Action 1: WordPress > Change user role to “Member”
- Action 2: BuddyBoss > Add user to the “New Members” group
- Action 3: Automator > Send a welcome email
- Action 4: ActiveCampaign > Add the “Onboarded” tag
- Action 5: Slack > Send a notification to the #new-members channel
This is the real power of the Automator integration: a single code redemption can orchestrate a complex onboarding workflow across multiple platforms.
Selling Automator-Type Codes via WooCommerce
You can sell Automator-type codes as WooCommerce products, just like LearnDash-type codes. The setup is the same — create a code product, link it to an Automator batch, and customers receive codes on purchase. See Sell Code Batches as WooCommerce Products for the full setup guide.
The difference is in what happens when the code is redeemed: instead of enrolling the user in a course, the redemption fires your Automator recipe.
Related Articles
- Getting Started with Uncanny Codes — Overview of all Codes workflows
- Connecting Codes to Uncanny Automator — Basic setup guide
- Codes + Automator: Advanced Workflows — More recipe examples and advanced patterns
- Standalone Code Redemption — Add a redemption form to any page
- Sell Code Batches as WooCommerce Products — Sell codes through WooCommerce