Gold stars and extra credit are fun ways to motivate students and reward them for their hard work—but they don’t exactly speak to credentials. Certificates, however, give students something to work towards and serve as a tangible testament to their academic achievements. They also just look great hanging on the wall.
In this step-by-step guide, we’ll show you how to improve student engagement using LearnDash certificates. Keep that certificate seal handy—with these eight cool ways to use LearnDash certificates, you’re going to need it!
What You’ll Need
Just like your students need tools for learning, you’re going to need some tools for awarding certificates and improving student engagement. Sadly, a laser pointer won’t do but we think you’ll find these plugins and add-ons much more helpful—and far less hazardous to your eyesight. They’re both easy to use and have a free version you can demo before making an investment.
Uncanny Toolkit Pro
Uncanny Toolkit Pro is the #1 must-have add-on for LearnDash websites—probably because it’s a masterclass in “Saving Time for Your LMS”. In addition to features such as course dashboards and personalized logins, Toolkit improves the functionality of LearnDash certificates to make administration easy and improve the student experience. Enhance your certification process with modules to preview certificates, automatically email them to students and staff or let your students show off their credentials with a certificates widget.
Feel free to check out the full list of features and the Pro pricing schedule by clicking here. We’ll be using Toolkit Pro features in our examples but that doesn’t mean you can’t download the free plugin and try out core modules.
Uncanny Automator Pro
If you’re running an LMS WordPress website, then Uncanny Automator is the best way to save yourself time and money. Connect your various apps and plugins for enhanced functionality, automate repetitive tasks and workflows and eliminate bloat from your website. Specifically, Automator packs so many LearnDash triggers and actions into even the free version of the plugin that you’ll feel like you’re cheating on an exam.
With Automator’s no-code, click-and-configure interface, you’ll be able to email LearnDash certificates to anyone on your contact list for just about any interaction that occurs on your website. In case that wasn’t enough, you can connect your LearnDash certification process to databases like Airtable, CRM tools like ActiveCampaign, ecommerce plugins like WooCommerce or even membership plugins like Restrict Content Pro.
Definitely try out the free Automator plugin and its dozens of LearnDash actions and triggers. Then, when you’ve gotten the hang of it, upgrade to Automator Pro to make the most of your LMS.
In addition to Toolkit Pro and Automator Pro, we’ll feature other commonly-used plugins and apps such as WooCommerce and The Events Calendar but these are only optional.
7 Cool Ways to Award LearnDash Certificates
Now that you’re all set up with the right tools, let’s look at these seven cool ways to award LearnDash certificates so that your students can start decorating their walls with their credentials.
1. Email LearnDash Certificates with Toolkit Pro
Uncanny Toolkit Pro allows you to email PDF copies of certificates to students and administrators with just a click. Here’s how it’s done:
Step 1: From your WordPress Admin Sidebar, navigate to Uncanny Toolkit > Modules.
Step 2: Scroll down to the modules titled Send Course Certificates by Email and Send Quiz Certificates by Email or type “certificates” into the search bar.
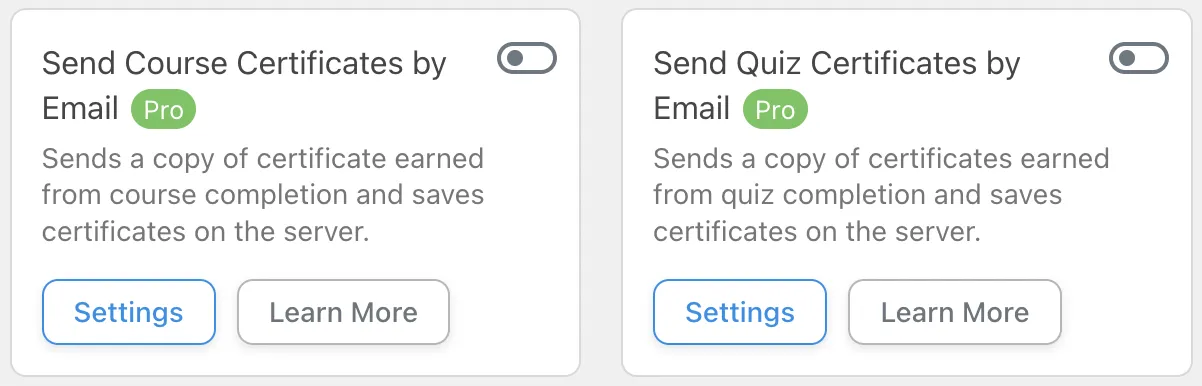
Step 3: Toggle the button in the upper right-hand corner to the “On” position.
Step 4: Click Settings to configure the module and draft the email. You can then decide who will receive the email and draft the title and content using dynamic data to personalize the message.
Step 5: Once you’ve configured the settings and drafted your email message, click Save module. Your students will now receive automated emails with a PDF copy of their certificate, ready for printing and framing!
2. Email LearnDash Certificates with Shortcode and Magic
Using some “copy-and-paste” shortcode and a little magic, you can put the power of printing certificates in your students’ hands—or, more accurately, at their fingertips. Upon completion of a course, present your students with a button to click if they would like to receive an emailed copy of their certificate. Here’s how to cast the spell:
Step1: From your WordPress Admin Sidebar, navigate to Automator > Add New. In the pop-up window that appears, select Logged-in users.
Step 2: Name your recipe something that makes it easy to remember, like… Certified Magician.

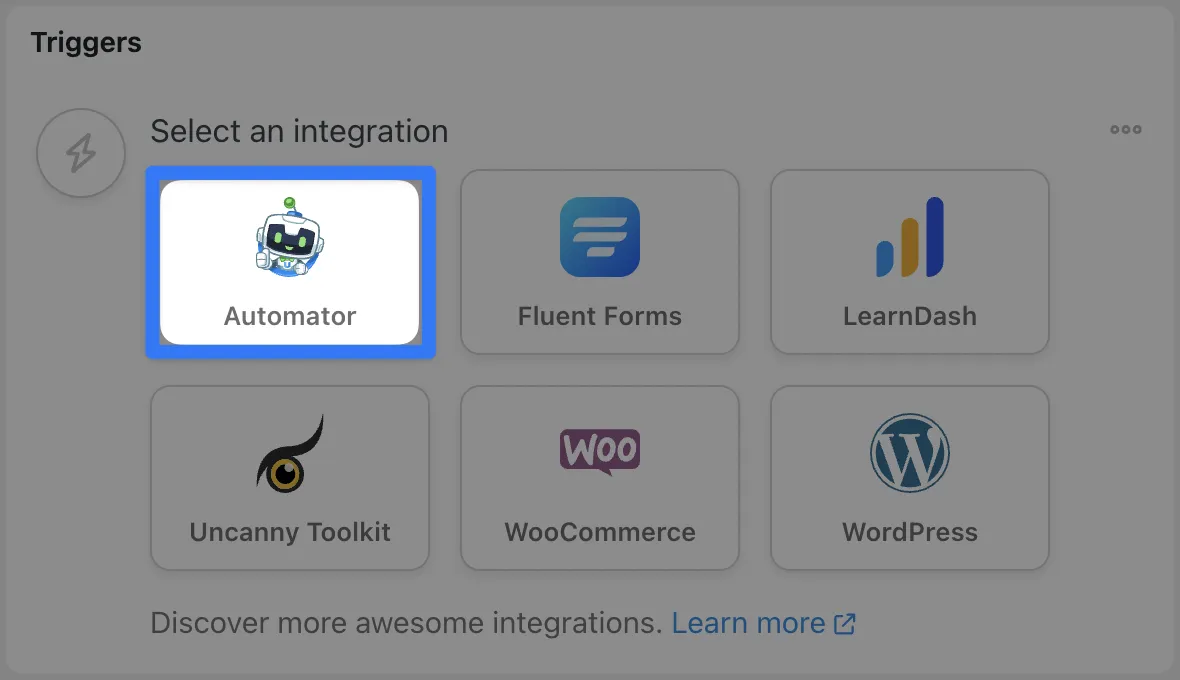
Step 3: From the menu of available integrations, click Automator.
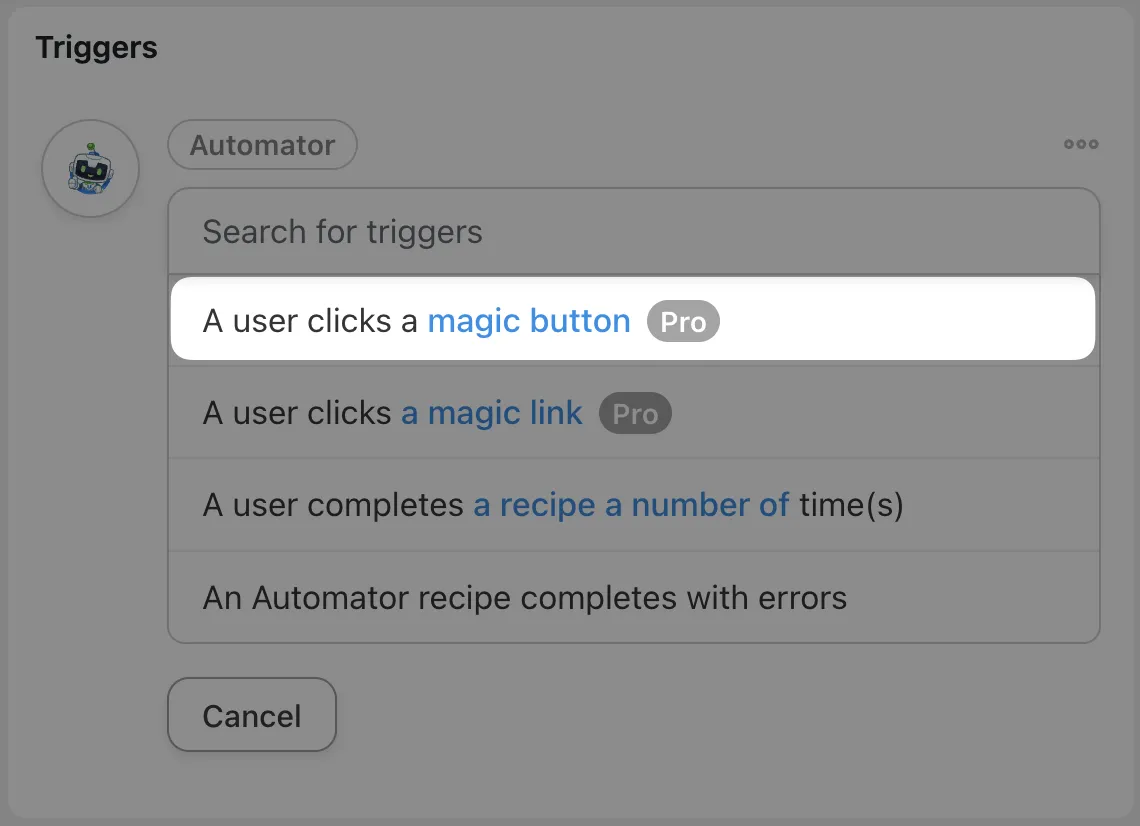
Step 4: From the drop-down list that appears, select A user clicks a magic button.
Step 5: Your trigger should now look like this:
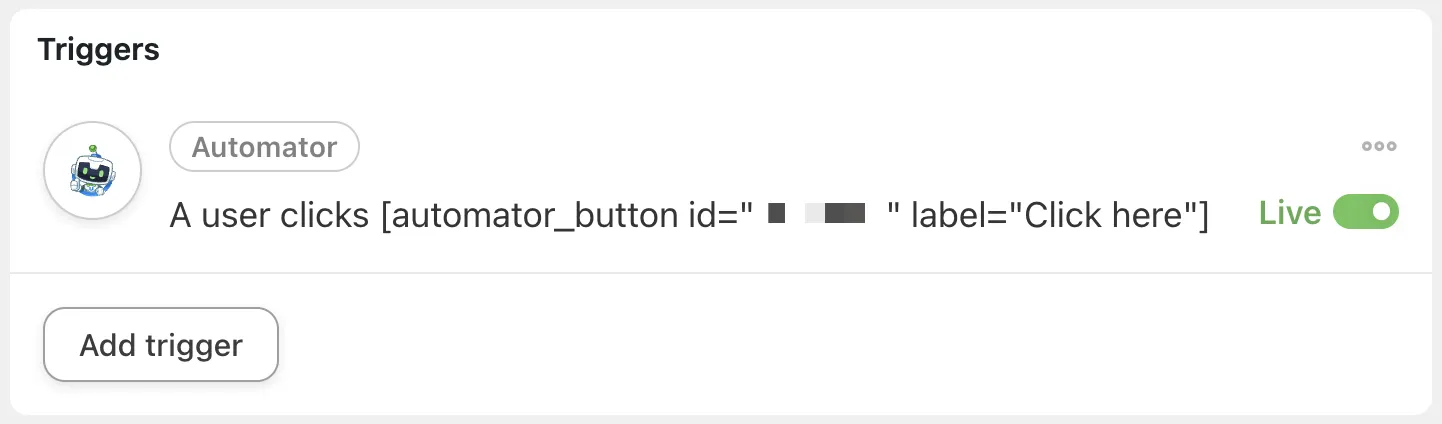
Copy the bracketed text [acutomator_button id=” xxxxx “ “ label=”Click here”] and save it to your clipboard. We’re going to embed this shortcode in the Classic Editor of the desired course.
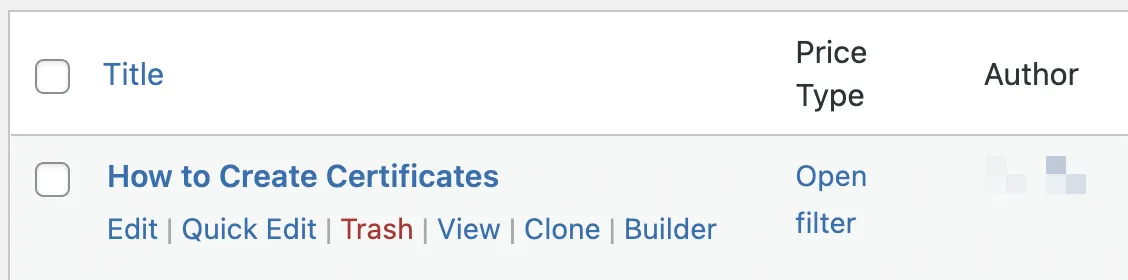
Step 6: From your WordPress Admin Sidebar, navigate to LearnDash > Courses and click Edit beneath the course for which you would like to offer certificates to students for course completion.
Step 7: In the Classic Editor screen, click the Add button icon then click Shortcode and paste the magic button shortcode (the bracketed text we copied from Step 5) into the box.

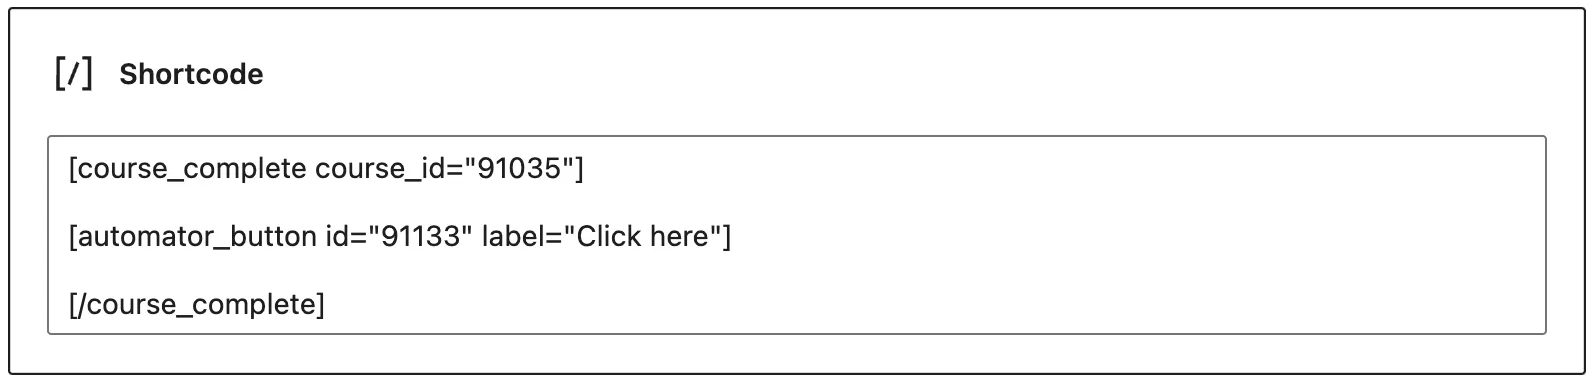
Step 8: Next, we’ll need some additional shortcode so that the Automator magic button only appears for students who have completed the course. Thankfully, LearnDash has a library of preset shortcodes for us to use. Click here for the LearnDash Course Complete shortcode or copy the bracketed text: [course_complete course_id=”12″]. Paste that shortcode above the Automator magic button shortcode. It should look like this:

Note that we’ve changed the Course ID. The simplest way to find your Course ID, if you don’t know it, is to return to the Course page and hover over the course with your mouse. A box should appear on the bottom left-hand corner of your browser window. In that line of text, the number following post= is the Course ID.
![]()
Step 9: Below the Automator magic button shortcode, paste [/course_complete] so that the finished block should now look like this:
The Automator magic button will now only appear to students who have completed the course. You can add a new block above this one, describing the purpose and function of the Automator magic button or you change the label itself to something more descriptive by simply replacing “Click here”.
Step 10: Return to your Automator recipe by navigating to Automator > All recipes and clicking Edit beneath Certified Magician.
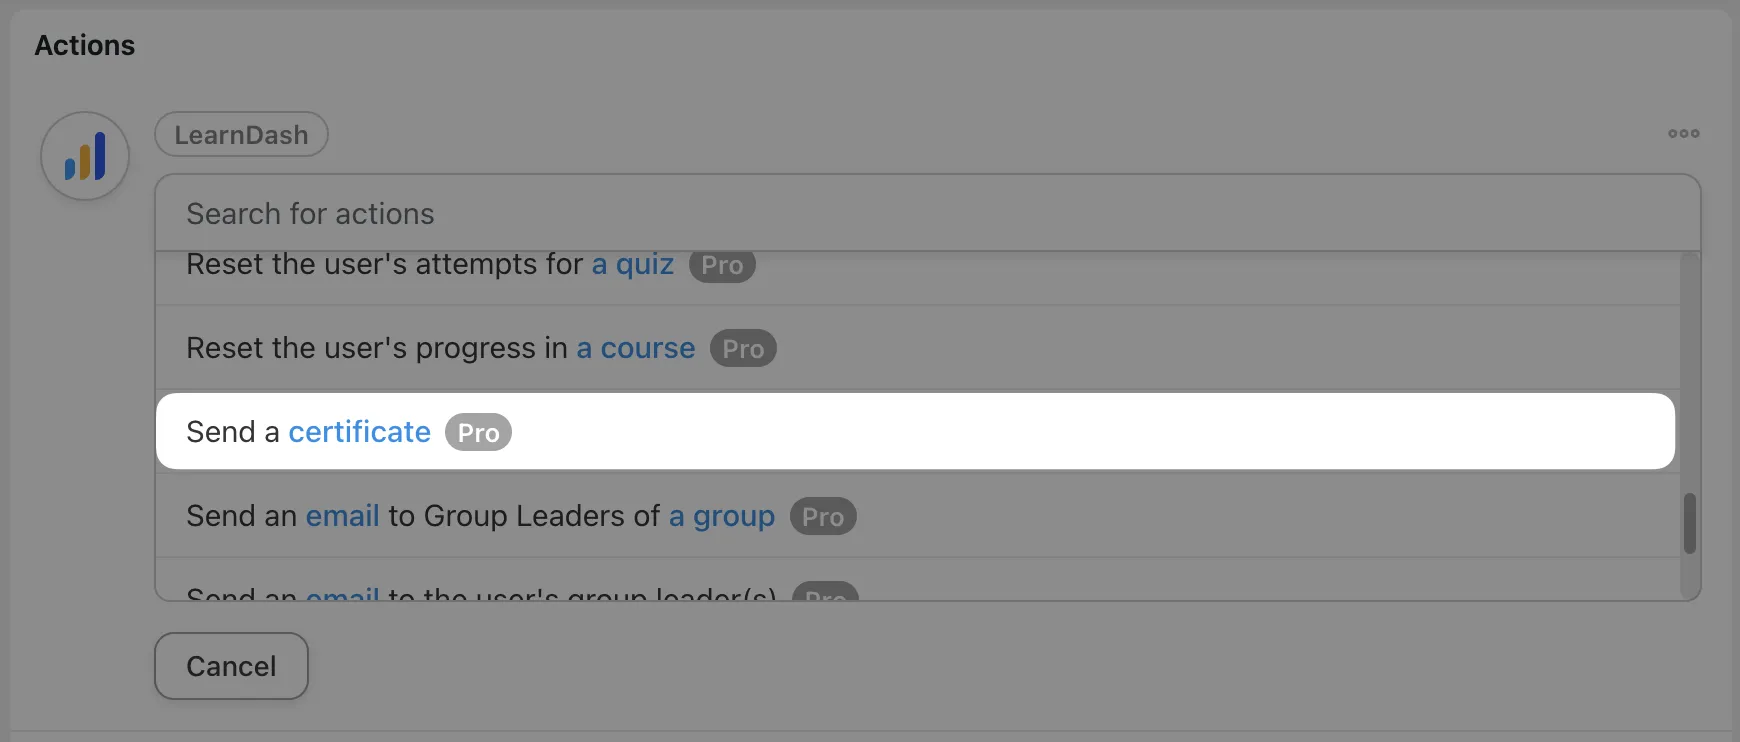
Step 11: In the Actions panel, click Add action then click LearnDash.
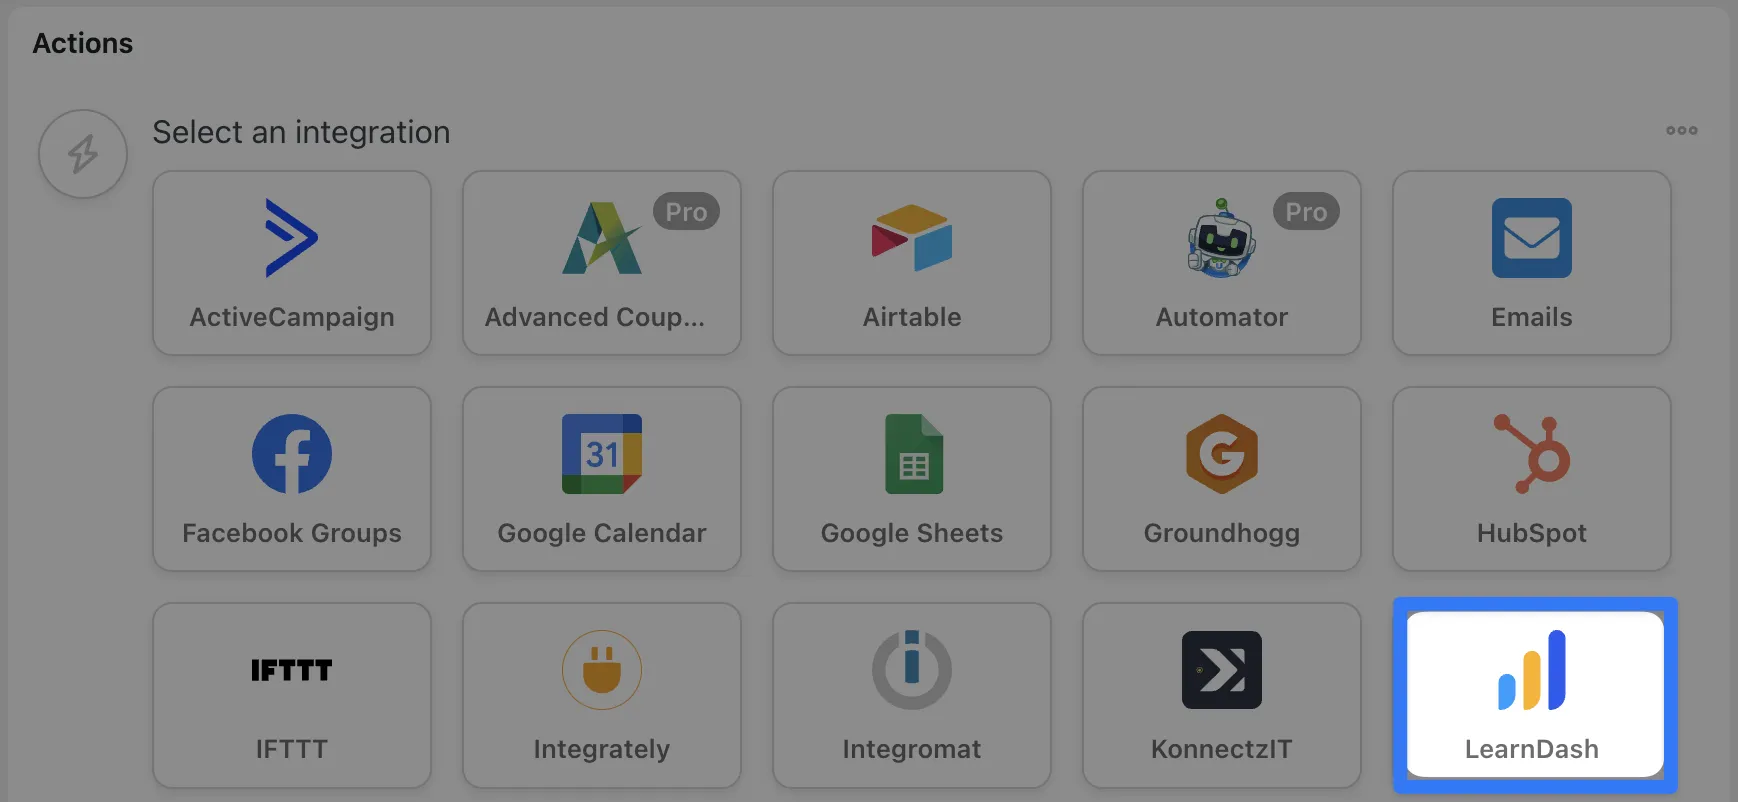
From the drop-down list that appears, select Send a certificate.
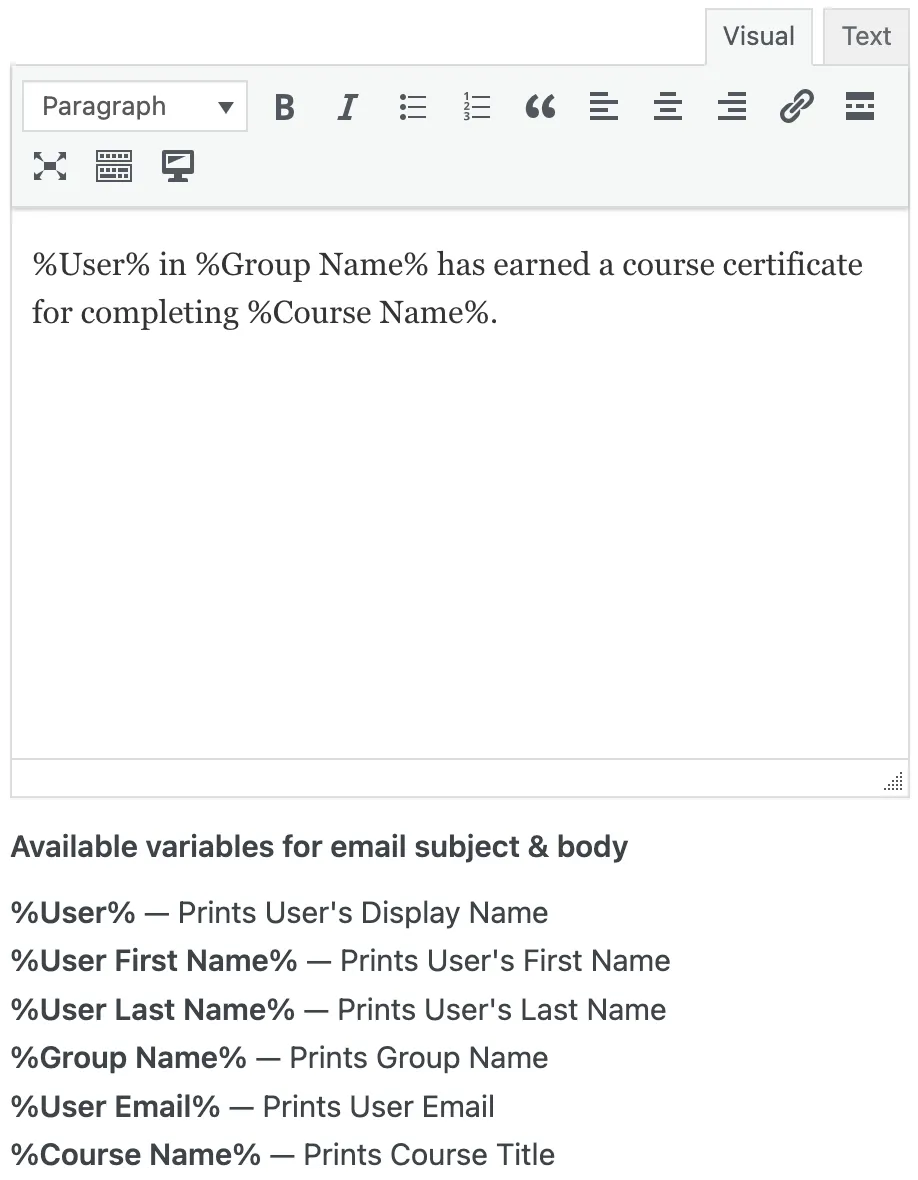
Use tokens such as User email, User first name, etc. to send, draft and customize your email.
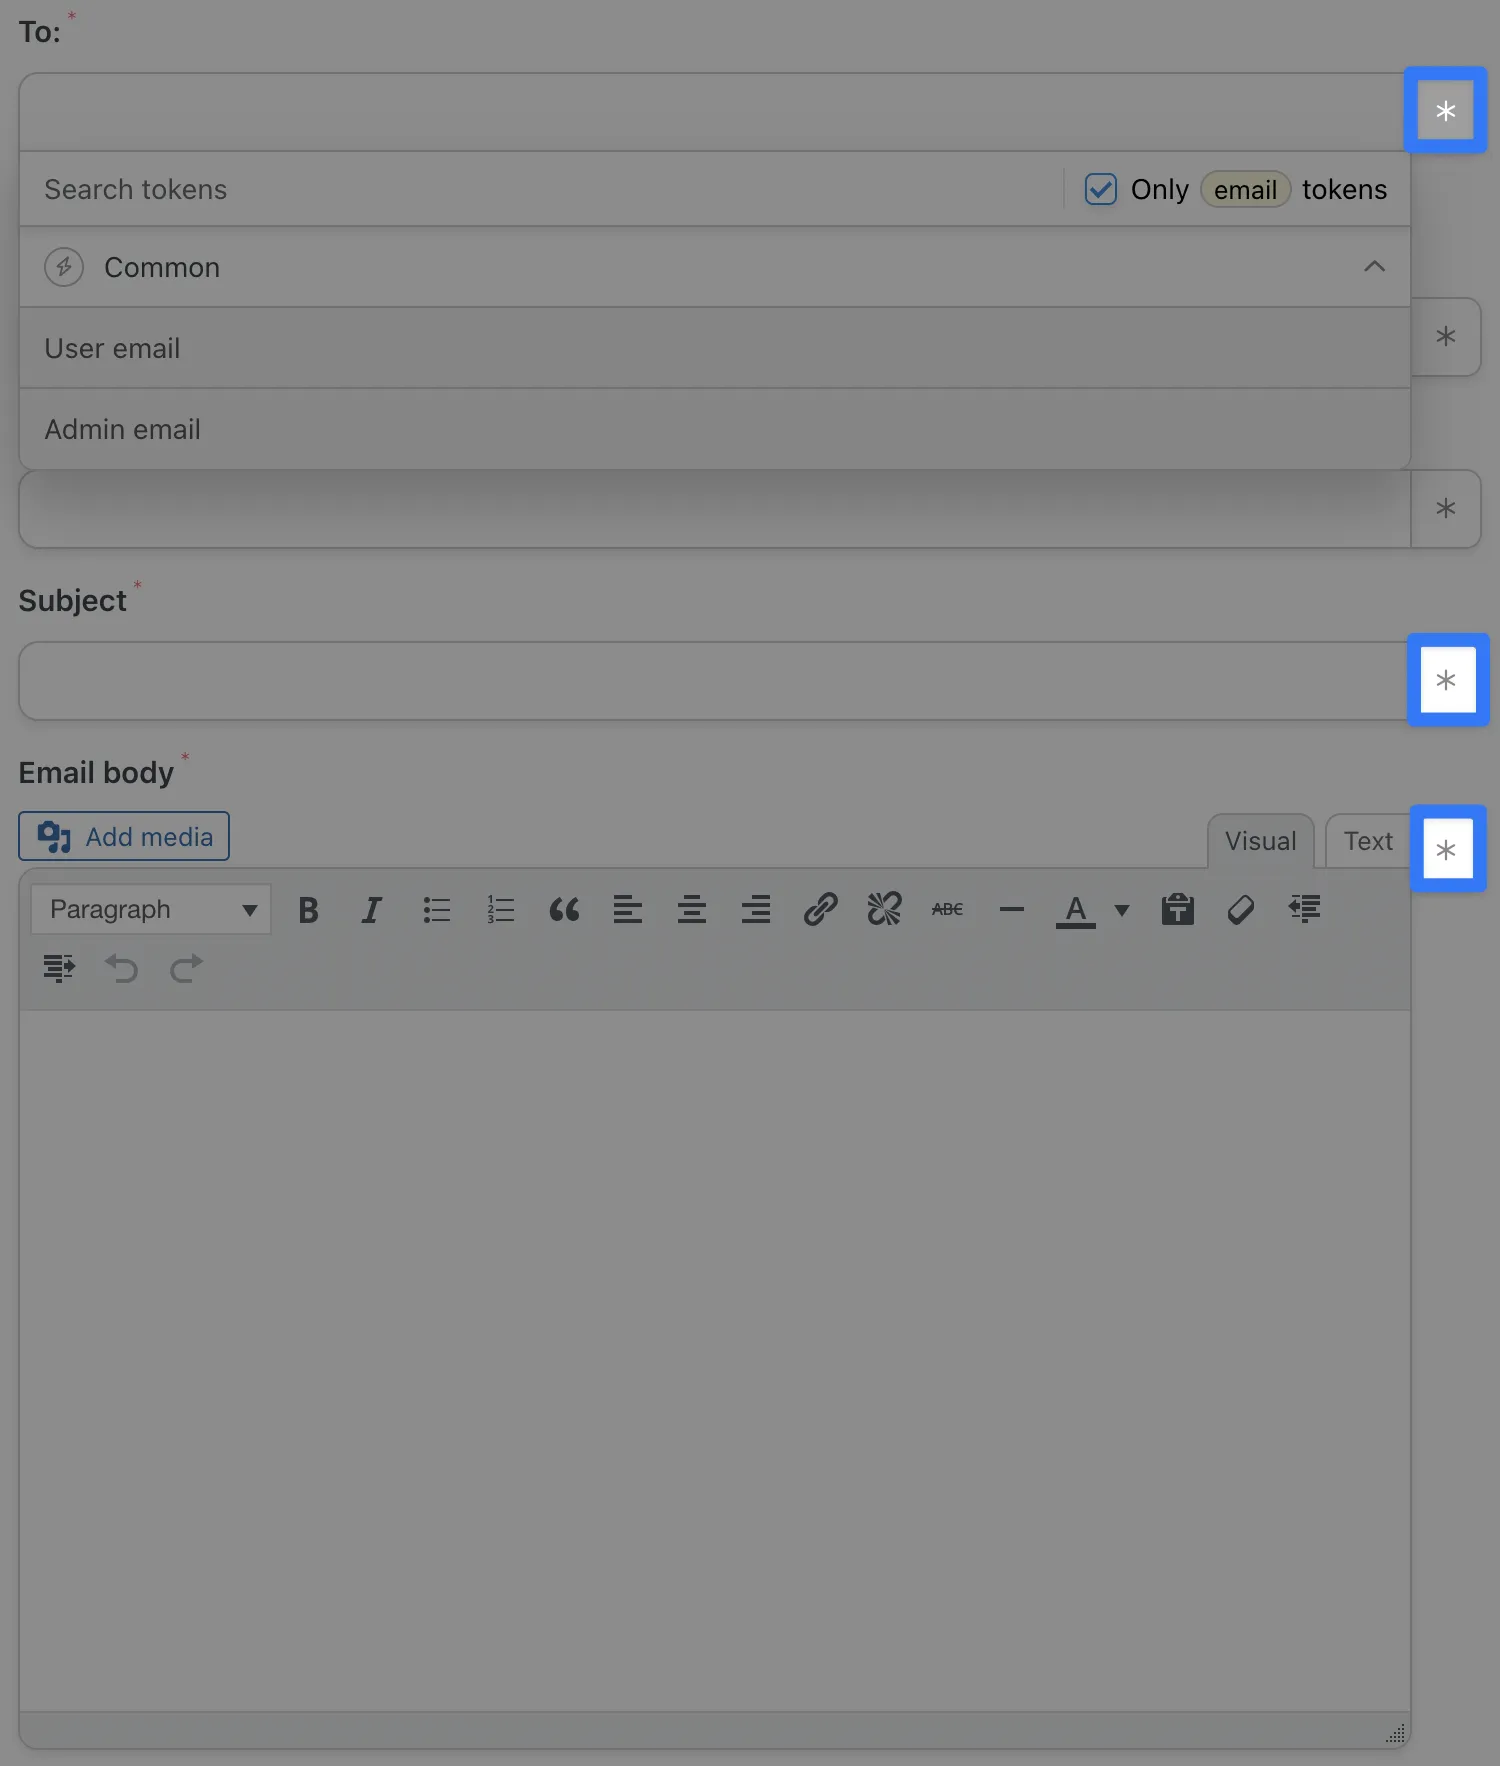
Note: When formatting the Certificate body, do not use shortcodes. As in the image above, only use tokens by clicking on the asterisk symbol. You can use these tokens to include information such as dates, user first and last names and courses.
Step 12: In the upper right-hand corner, toggle the recipe from Draft to Live. It should look like this:
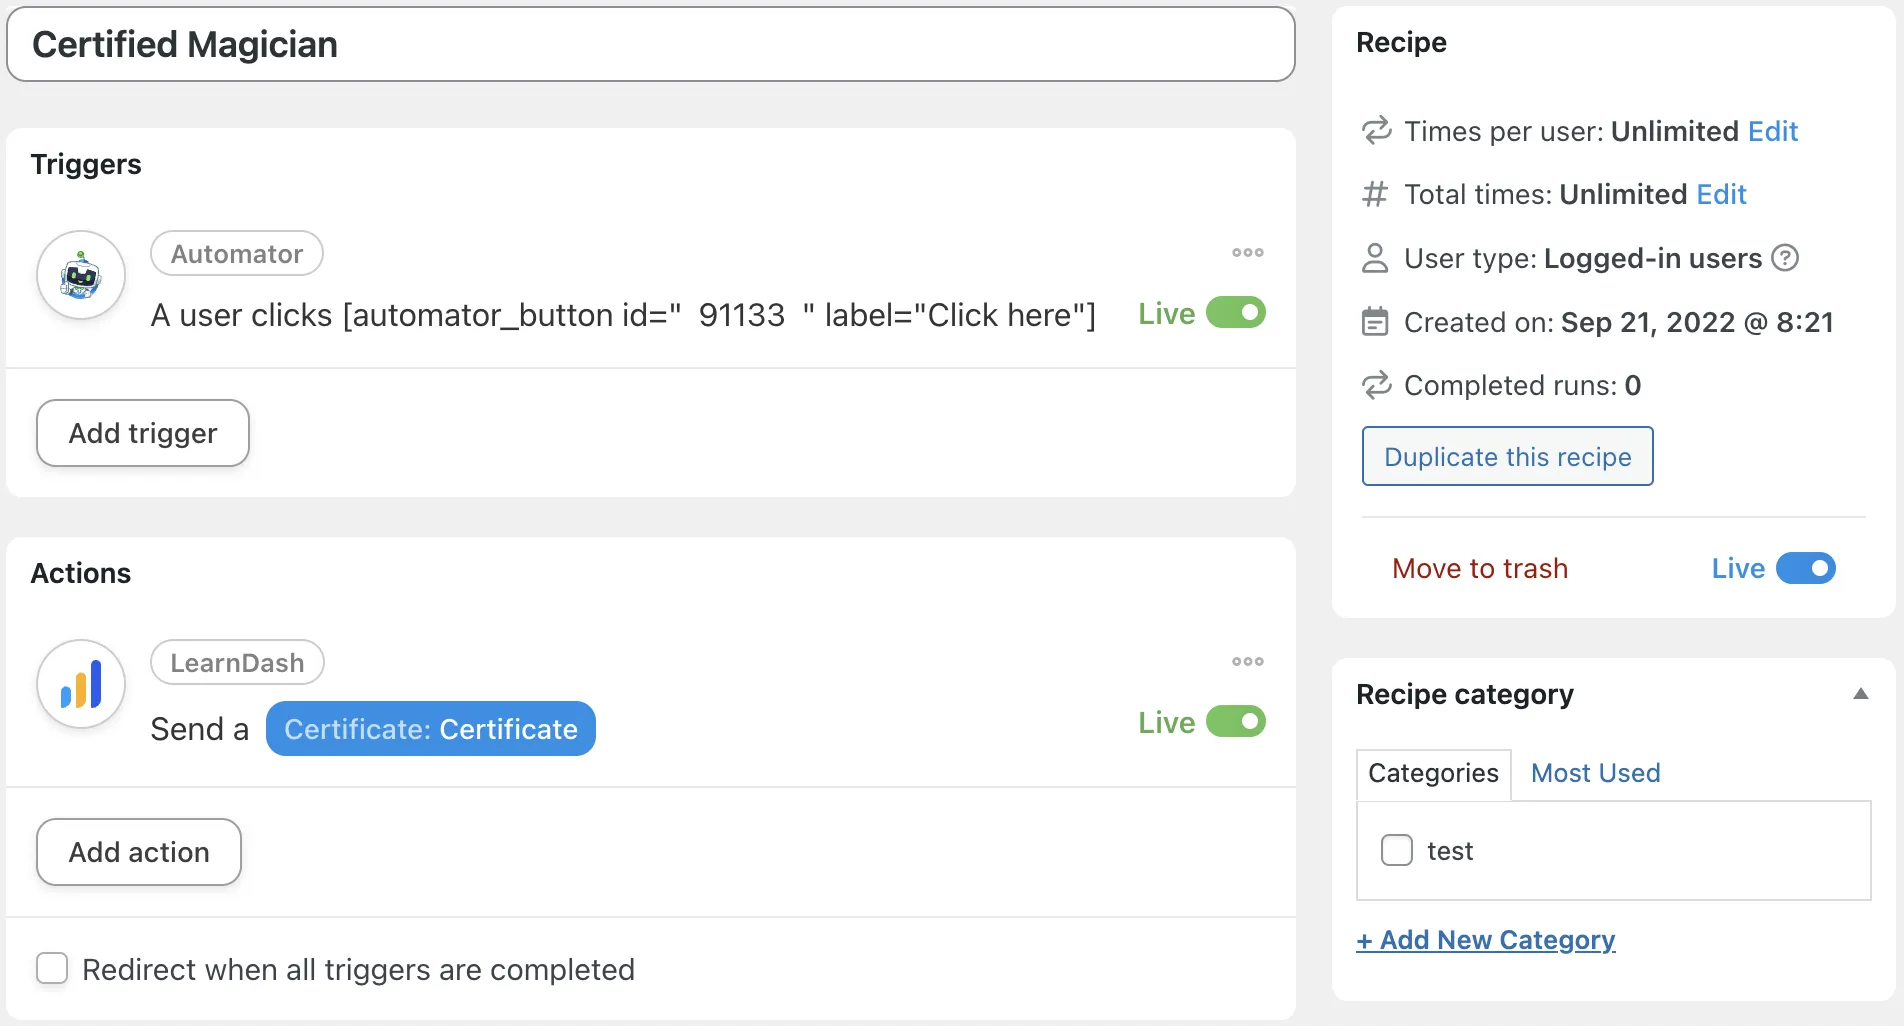
“Abracadabra!” Just like that, your students can receive their certificate upon course completion with just a click.
3. Sell LearnDash Certificates with Automator and WooCommerce
Learning should be—and often is—totally free. But credentials often come with costs. With Automator and WooCommerce, you can offer paid LearnDash certificates for free courses. Here’s the best way to sell those certificates:
Step 1: The first thing you’ll want to do is to create a WooCommerce product. You’ll then connect this product to a LearnDash certificate using Automator.
From your WordPress Admin Sidebar, navigate to Products > Add New. In the Product data panel, set the product to Virtual.
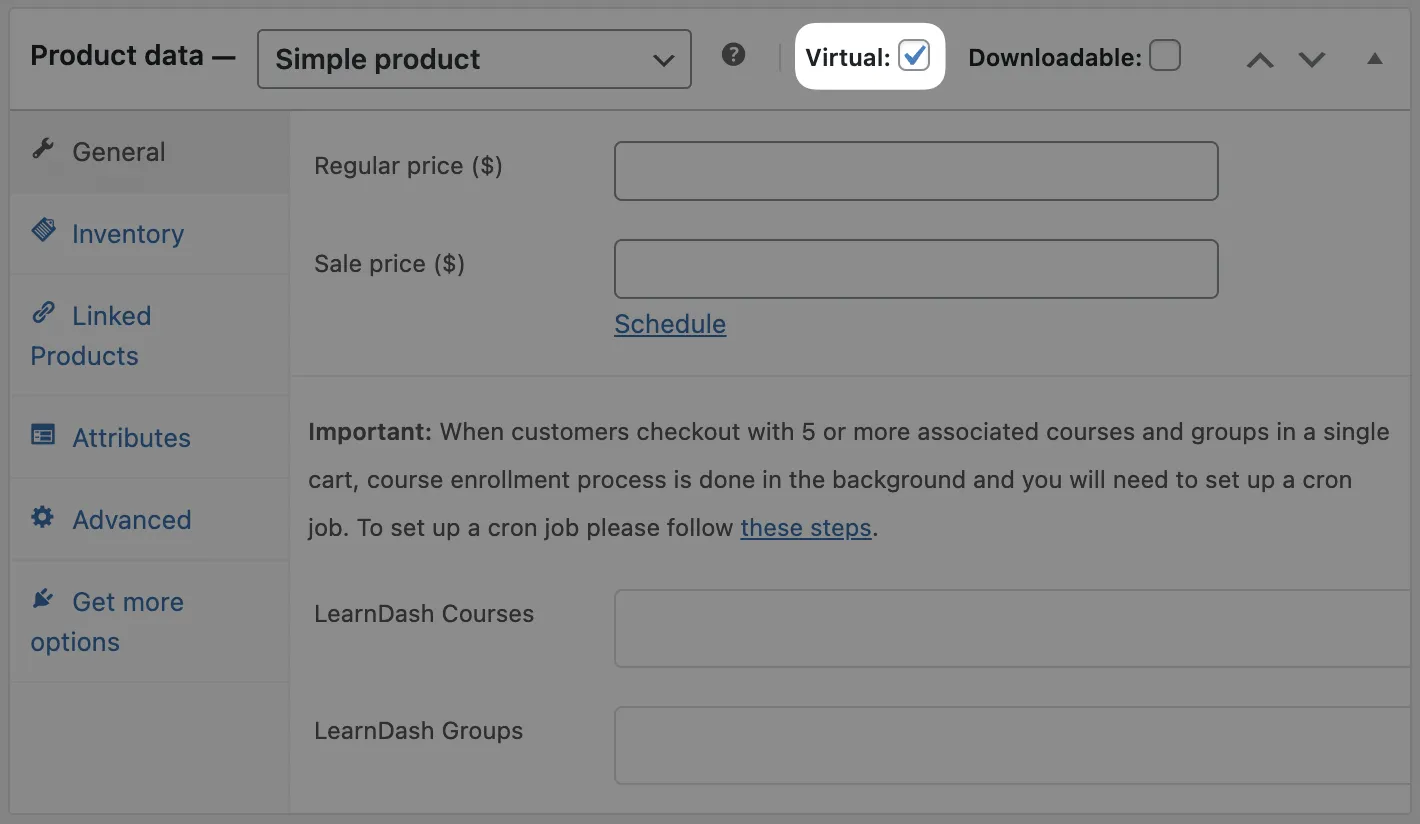
Finish configuring your product as you’d like by setting the price, image(s), upsells, cross-sells, etc. Once the product is to your liking, click Publish.
Step 2: In these next steps, we’ll create a recipe that connects your WooCommerce product to a LearnDash certificate. We’ll add an additional trigger so that only the students who have earned the certificate will receive it.
From your WordPress Admin Sidebar, navigate to Automator > Add New and select Logged-in users.
Step 3: Name your recipe. We’ve named this recipe WooCommerce-LearnDash: Certificate Order.
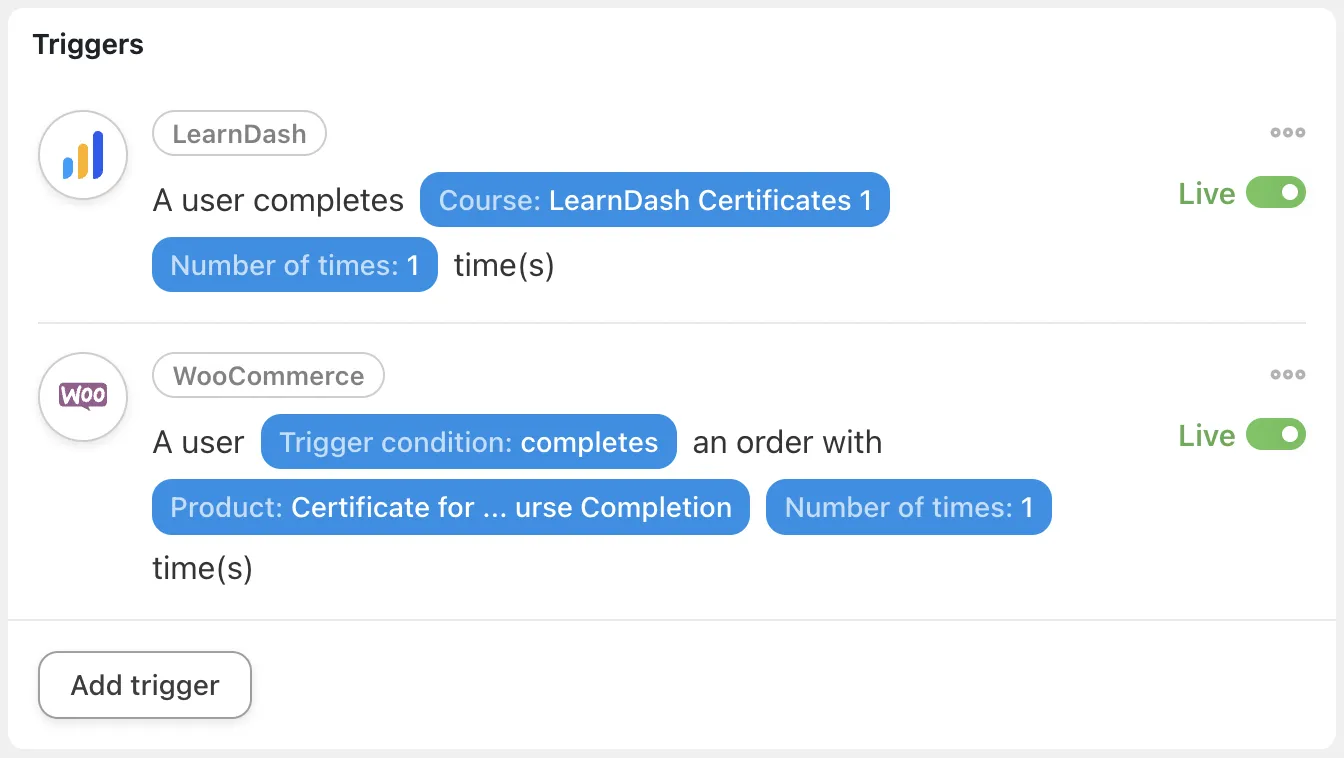
Step 4: In the Triggers panel, click LearnDash. From the drop-down list, select A user completes a course. Select the course associated with the certificate and click Save.

Step 5: Still in the Triggers panel, click Add trigger then WooCommerce. From the drop-down list, select A user completes, pays for, lands on a thank you page for an order with a product.
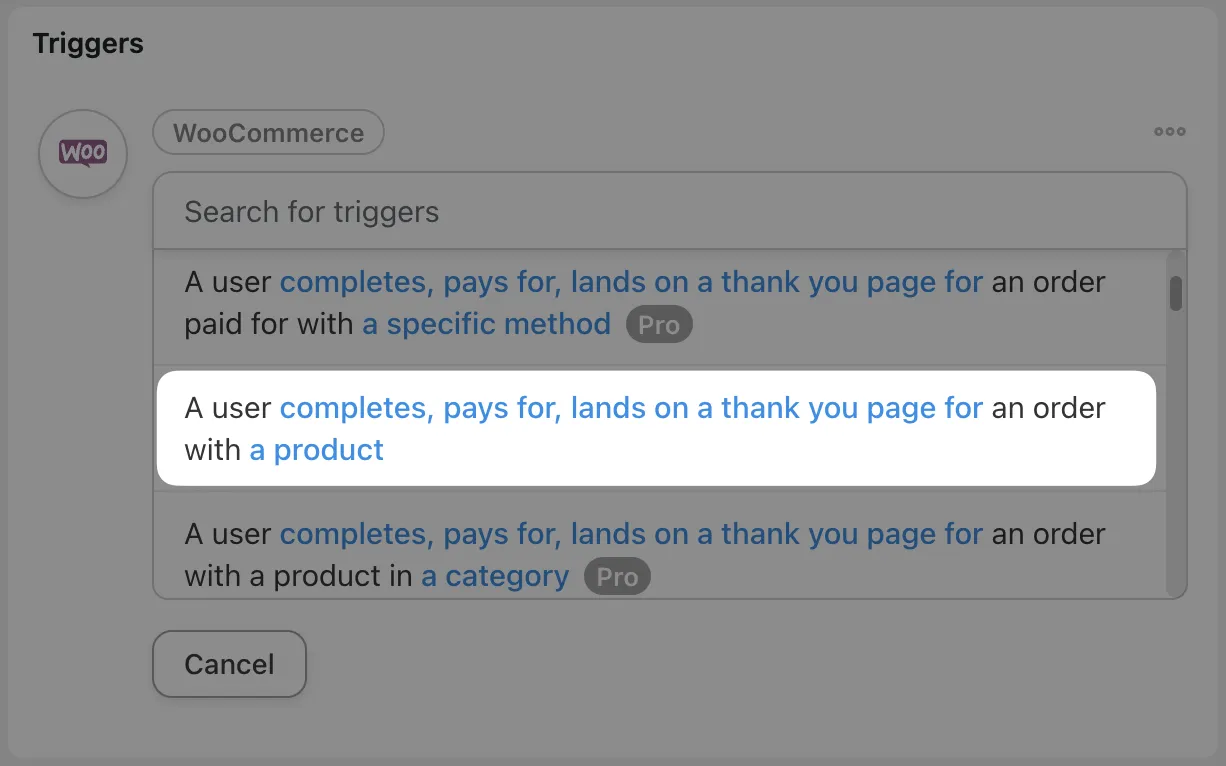
Step 6: Automator will prompt you to configure the rest of the trigger settings. We selected completes then chose our newly created product from the drop-down list. Your finished triggers should look something like this:
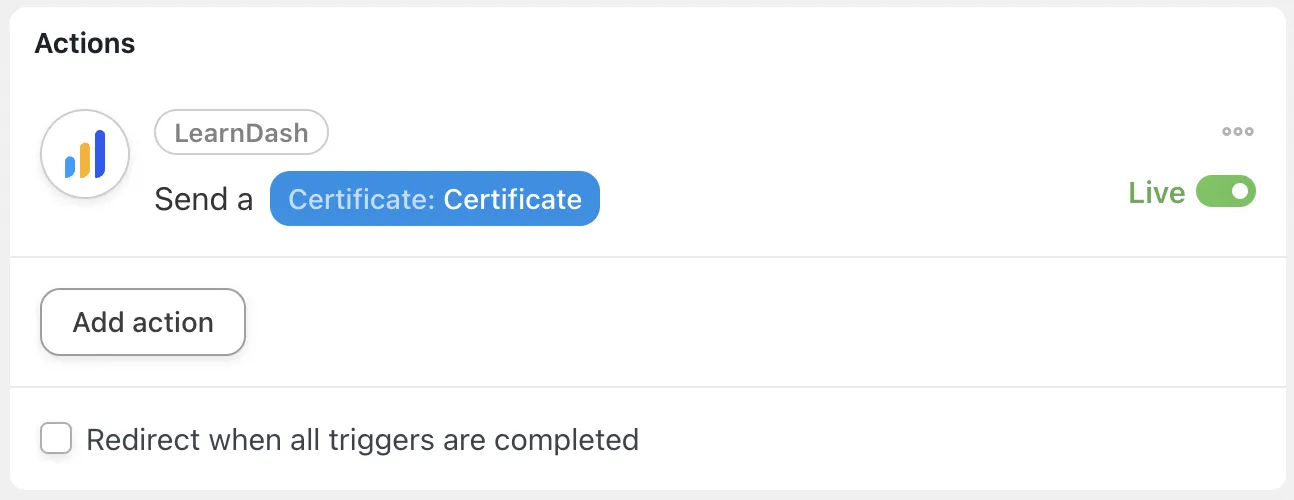
Step 7: In the Actions panel, click Add action then click LearnDash. From the drop-down list, select Send a certificate and configure the rest of the settings. When you’re finished, click Save. Your action should look like this:
Step 8: Toggle the recipe from Draft to Live. Here’s what the final recipe should look like:

Step 9: Students can sometimes be forgetful—because their heads are full of knowledge. If you wanted to ensure that your students get the recognition they deserve, you could create a second recipe to send an email upon course completion with a link for them to purchase their certificate. Grab the product url from the product page and paste it into the Email body field of your Automator action. That recipe might look something like this:

You could also use Automator’s tagging actions with CRMs like Groundhogg, Mailchimp or Mailpoet to send even more compelling emails and boost conversions.
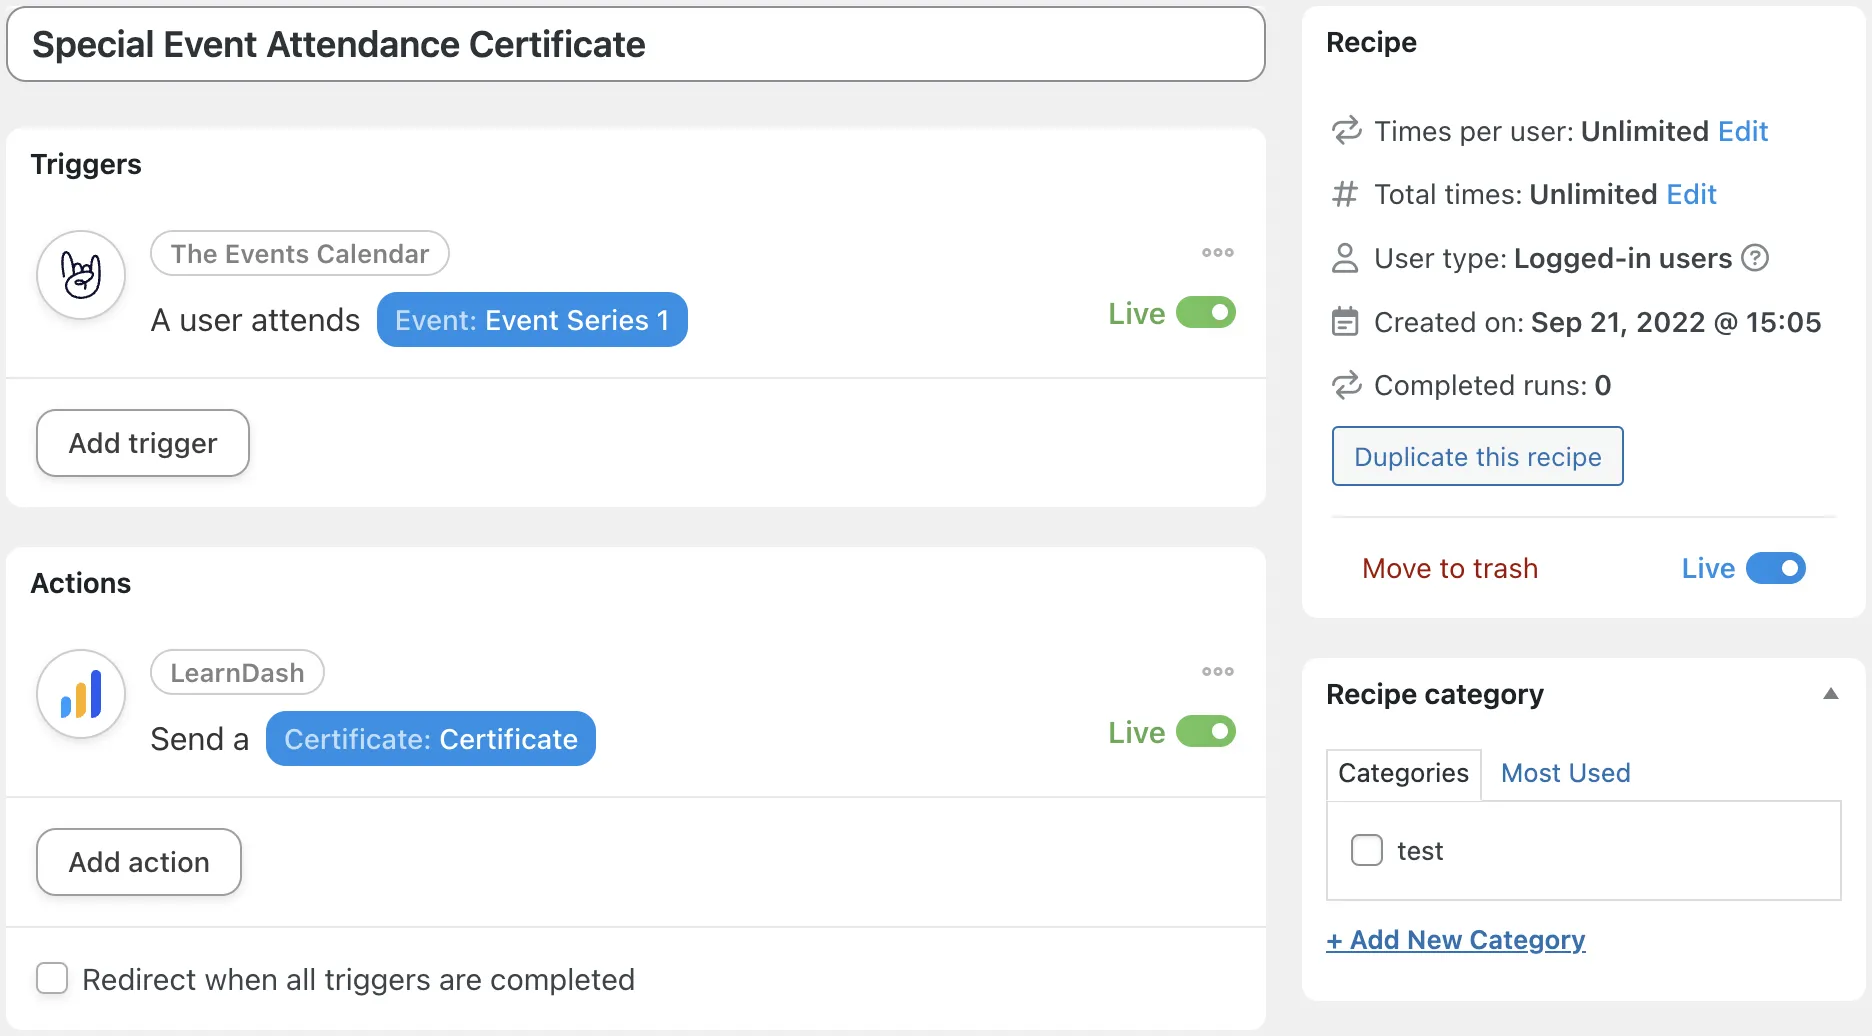
4. Award LearnDash Certificates for Live Event Attendance
Who doesn’t love to have a perfect attendance record? You can use Automator to send certificates to attendees of live events as a way for your students to remember the occasion. Here’s how to send certificates as souvenirs of successful events:
Step 1: From your WordPress Admin Sidebar, navigate to Automator > Add New and select Logged-in users.
Step 2: Name your recipe. We’ve named this recipe Special Event Attendance Certificate.
Step 3: In the Actions panel, click The Event Calendar and select A user attends an event. Automator will prompt you to select your event from a drop-down list. After you’ve selected your event, click Save.
Step 4: In the Actions panel, click Add action then click LearnDash. From the drop-down list, select Send a certificate and configure the rest of the settings. When you’re finished, click Save.
Step 5: Toggle your recipe from Draft to Live. The finished recipe should look like this:
Step 6: Concerned about event certificates only being available by email and not from the website? One solution would be to create a hidden course with an associated course certificate. Then, in our event attendance recipe, change the action so it completes the hidden course instead of sending the certificate via email.
This way, the Toolkit Pro module to send a certificate can provide it by email, and the Show Certificates module in the free version of Uncanny Toolkit can show event certificates to students!
5. Credit & Course Group Based Certificates
Credit where credit is due—which, in this case, means awarding certificates. If you have purchased the Uncanny Continuing Education Credits plugin, you can award certificates for groups of courses as well as for credits earned. Here’s how to claim the credit:
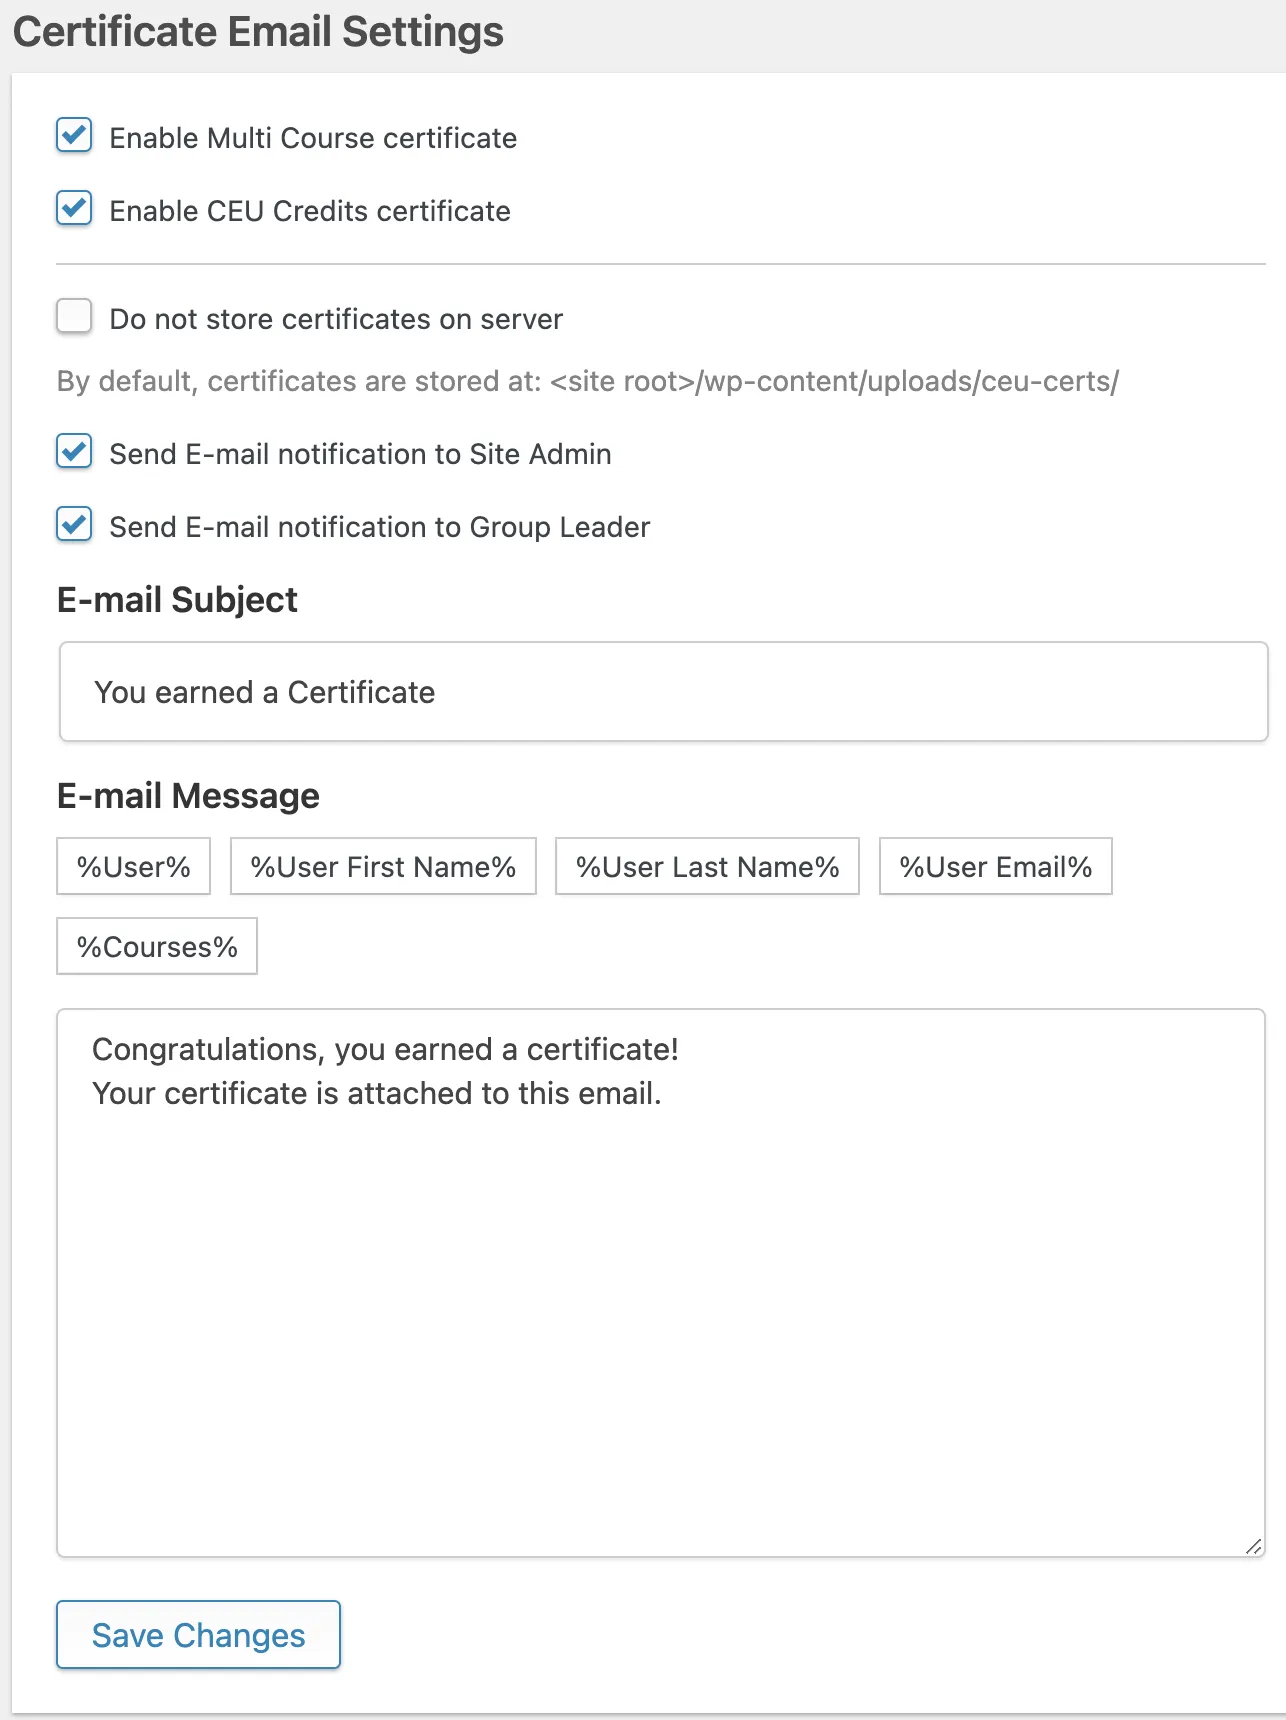
Step 1: After downloading the Uncanny Continuing Education Credit plugin, navigate Uncanny CEU > Settings.
Step 2: Scroll down to the section labeled Certificate Email Settings. Check the boxes next to Enable Multi Course certificate and Enable CEU Credits certificate. You can also choose to send the certificate to Site Administrators and Group Leaders as a prudent recordkeeping practice.
Step 3: From your WordPress Admin Sidebar, navigate to LearnDash > Certificates. Select the certificate you would like to award based on credit or course groups or create a new one. On the right-hand side of the Classic Editor, you’ll see options to award the certificate based on CEU credits accumulated or courses completed.
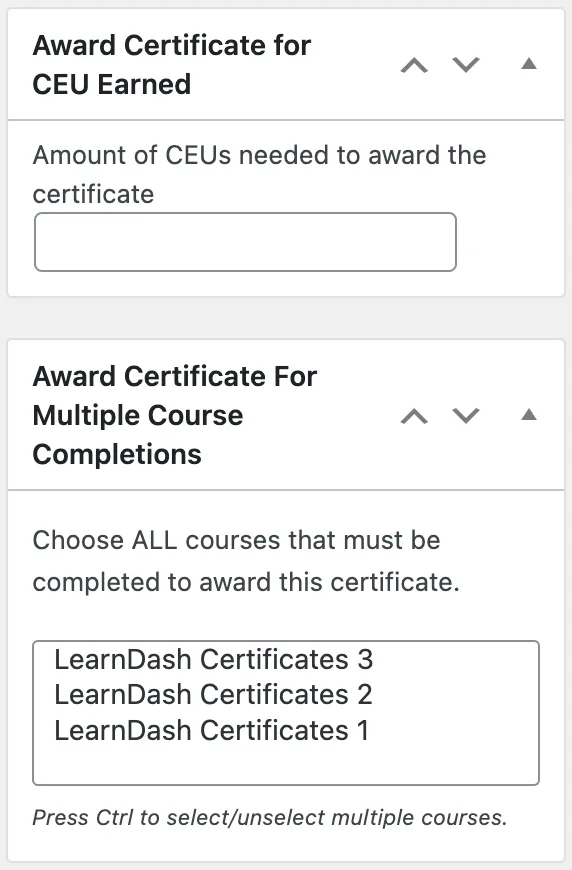
Once you’ve finished configuring your certificate, click Publish.
Step 4: Finally, navigate to LearnDash > Courses. From the Classic Editor within each course, you can set the CEU value. If you’re not certain how to do this—or would like to “continue” your Continuing Education Credits learning—click here.
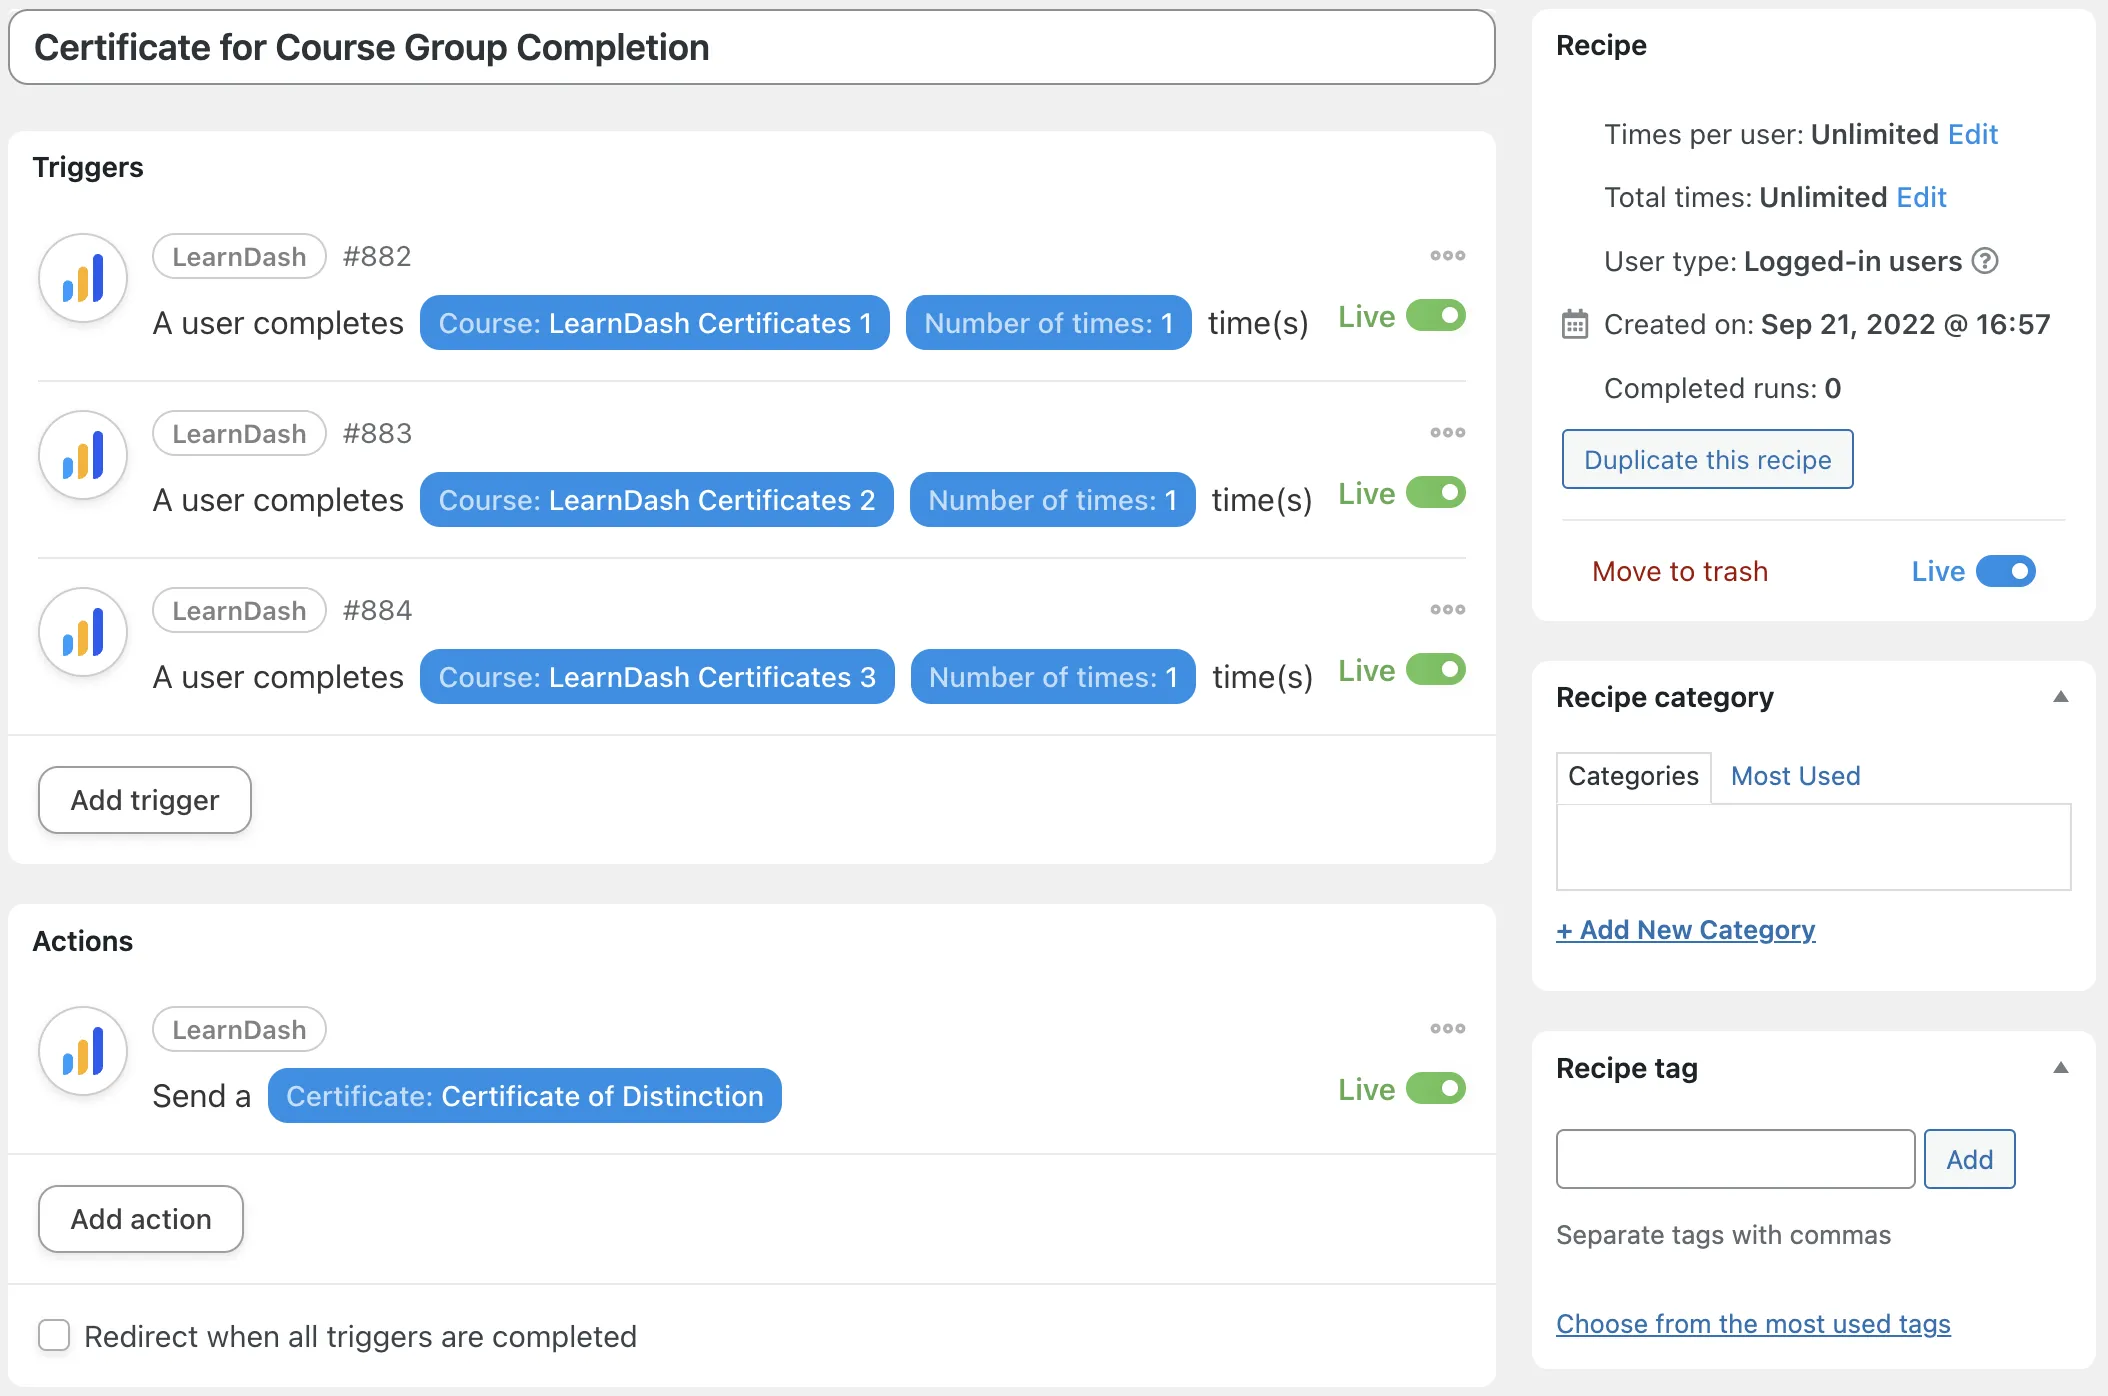
6. Award LearnDash Certificates for Course Series with Automator
If you don’t have the Uncanny Continuing Education Credits plugin, you can still award certificates to students who complete a series of courses using Automator. It’s a lot easier than building a curriculum, we promise.
This recipe won’t differ much from previous set-ups using Automator. The only difference is that you’ll add multiple triggers; one for each course. The finished recipe should look something like this:
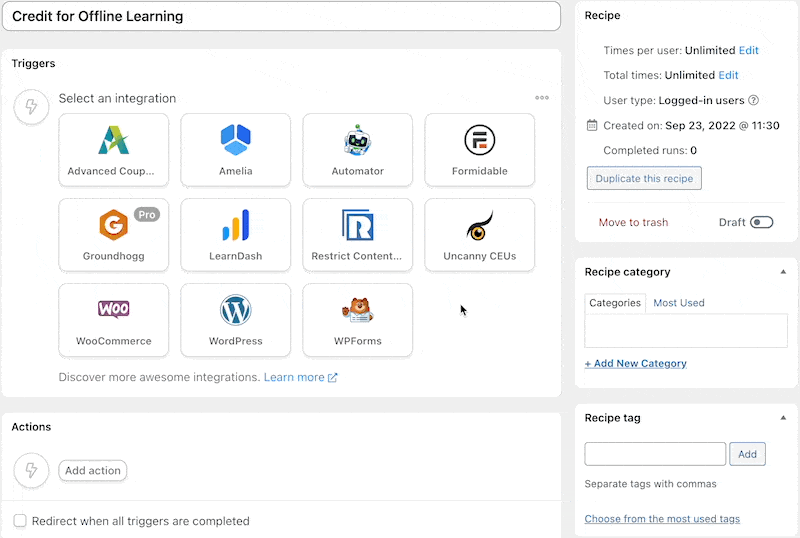
7. Award LearnDash Certificates for Offline Learning Activities
Why just keep the classroom online? You can leverage the power of LearnDash, Automator and Uncanny CEUs to make changes in the real world! Combine Automator with any form-building plugin or web application such as WPForms or Forminator to award credits and send certificates following offline learning events.
Step 1: You’ll need some method of verifying attendance for your offline learning activities—this will serve as the trigger for our Automator recipe. If you already have a verification process, you can skip to the next step.
For our verification process, we’ve created a form. This form can be a simple registration form or a more complex form with information only the attendees would know. It’s up to you to configure as you’d like.
Step 2: Create a new recipe in Automator, select Logged-in users and choose an appropriate title.
Step 3: In the Triggers panel, configure your trigger according to your verification process. In our example, we’ve selected our form-building integration and the form associated with our offline learning activity. Click Save.
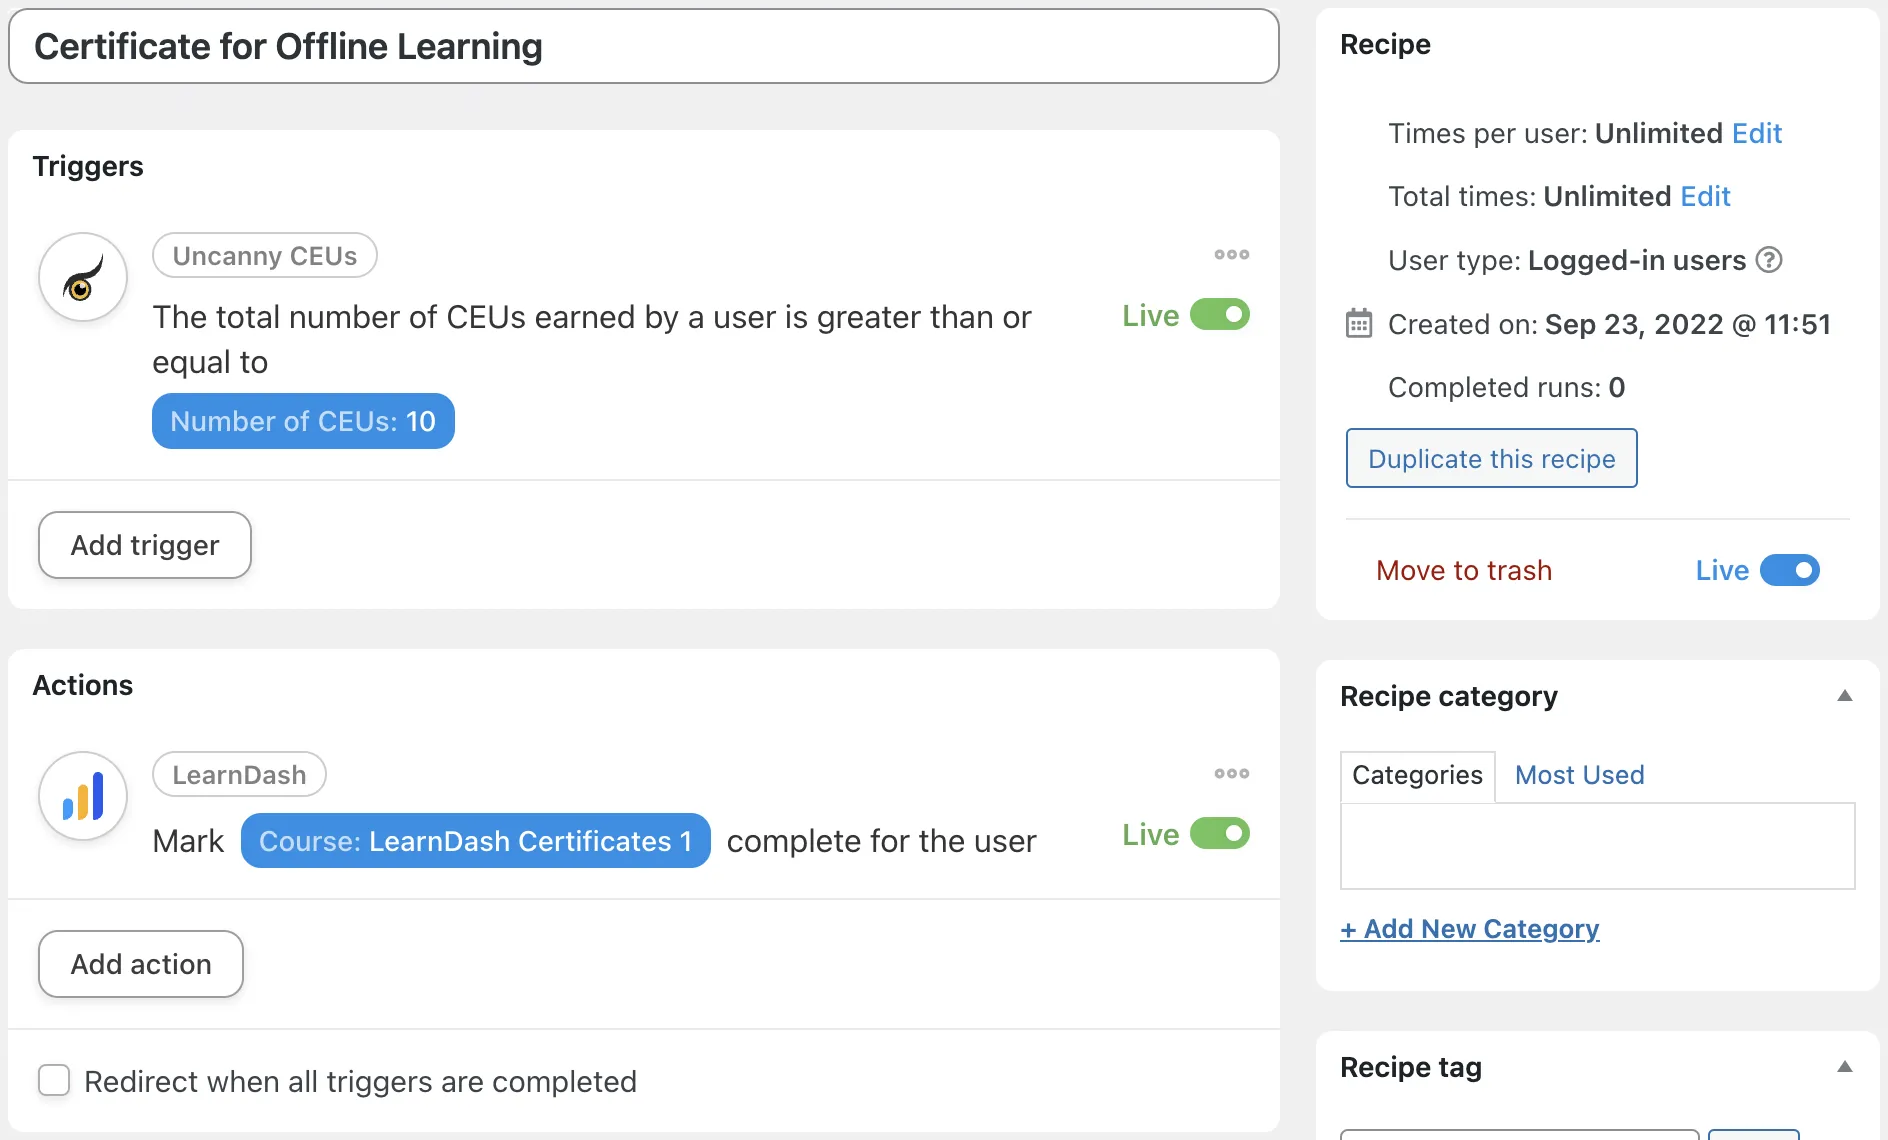
Step 4: In the Actions panel, click Uncanny CEUs then select Award a number of custom CEUs to the user. Automator will prompt you to fill out the date, description and number of CEUs to award. When you’re finished, click Save.
Step 5: Create a second recipe to send certificates or mark a hidden course complete (and send the certificate with Uncanny Toolkit) based on the total number of CEUs a student has earned. That recipe might look something like this:
Keep Certifying
For students, certificates are as good as gold medals… if there was an Academic Olympics. And tools such as Uncanny Automator and Uncanny Toolkit help you leverage the certification process to improve your LMS and, ultimately, your students’ experience.
Try out a few of the examples we provided in this post and we promise you’ll spend less time administrating and more time educating. Then, when you’re ready, upgrade to the All Access Pass and get even more Uncanny plugins and add-ons, not to mention industry-leading support. Now that’s certifiably cool.
I want to use your plugin to sell my certificate, i have completed all steps mention in the step in selling certificate with woocommerce using uncanny automator pro.
but have after following each procedure, i tested it but it didn’t work. please what else can i do or is there a video tutorial available for this
Hi, just a note that we aren’t able to help with support issues in our comments, but if you want to open a ticket we can take a look. We would need to see a screenshot of your recipe (with all details expanded) and a test case, so the steps you’re taking to trigger the purchase.