Today we pushed updates to 3 of our plugins (Uncanny Groups, Toolkit Pro and Tin Canny) and a fourth plugin update is coming tomorrow. While most of the changes are small fixes and improvements, there are some larger enhancements that deserve a bit more attention.
Uncanny Toolkit Pro for LearnDash
Perhaps the most interesting update is that the plugin, and specifically the Import Users module, no long requires LearnDash. This was done primarily to allow Uncanny Automator users to run imports that trigger actions as part of our new support for running actions on users in bulk. The Toolkit itself isn’t moving away from LearnDash, but this will be a big win for Automator users that aren’t necessarily using LearnDash.
The Enhanced CSV Reports module doubles the number of custom usermeta columns to 10. You can now run some very big reports with this tool with a lot of custom user profile data.
The Enhanced Course Grid module has the most changes, including all of the following:
There’s a new “hide_title” attribute to turn off course titles in the grid.
Multiple categories can now be defined for inclusion in the shortcode or block, separated by commas
There are 7 new action hooks, including the following: uo_course_after_short_description, uo_course_before_short_description, uo_course_before_course_title, uo_course_after_course_title, uo_course_after_featured_image, uo_course_after_grid_ribbon_price, and uo_course_after_grid_ribbon_text.
Overall, these changes add significantly more flexibility to what’s an already very flexible model for outputting course objects in a grid.
Uncanny Groups
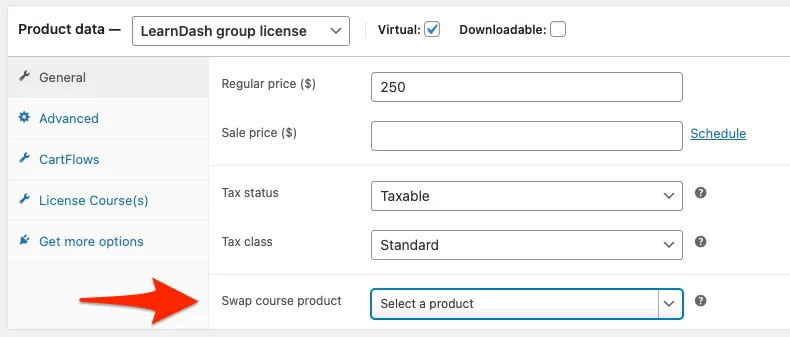
The big new feature in today’s Uncanny Groups release is support for switching products in someone’s cart based on quantity. Why is this important? In the current model, when a user buys a group product, it always creates a group and adds them as a Group Leader. This is true even if a user buys a single seat for the group. What this means is that there must be 2 workflows for course purchase, one for a group, one for personal use by a user. A site might then have a “Buy for myself” button as well as a “Buy for a group” button on a course, since they are different products. Having to make this decision is an extra step though, and buyers are often confused by it.
The new option to swap products allows sites to present a single product to prospective buyers without having to choose whether it’s for a group or themselves. Instead, if the quantity is 1, the system (optionally) assumes the purchase is for themselves and can swap in a Course or other product. If the quantity is greater than 1, the Group License product is used. When a quantity is selected and the product added to the cart, the swap (if the quantity is 1) is automatic.
Here’s what it looks like when editing a group product:
For developers, the Uncanny Groups 4.2 release adds 2 new actions: ulgm_before_license_group_is_inserted and ulgm_after_license_group_is_inserted.
There are also 3 new filters: ulgm_license_group_linked_course_id, ulgm_license_group_courses_linked_in_order and ulgm_include_user_direct_enrolled_courses (the latter for the Group Progress report).
Other Improvements
The Tin Canny release adds new support for negative scores in the individual quiz report as well as support for SCORM module uploads that may be missing requirement elements, like a title.
Across all plugin releases, there are also various compatibility fixes for LearnDash 3.6, PHP 8 and WPML. Yes, while our plugins have been translation friendly for years, we are starting to also add explicit WPML support where compatibility issues are reported.
LearnDash is one of the most popular LMS (Learning Management System) plugins in the WordPress industry. You can create and sell courses, award certificates, create quizzes, and much more using this powerful plugin.
LearnDash offers a number of free and premium addons to enhance the functionality of your eLearning site. One such addon is LearnDash Achievements. It is a free plugin for LearnDash customers used for creating and displaying achievement banners on your eLearning site.
In this article, we’ll introduce you to the LearnDash Achievements addon, discuss things you can do using this addon, and show how you can do more with the addon by connecting it to popular WordPress plugins. Let’s dive in.
Introducing LearnDash Achievements Addon
LearnDash introduced the Achievements addon to add gamification features to your eLearning site. You can increase the engagement level of your students by awarding badges or points using this addon. It will also help you to improve the learning experience of your students.
The Achievements addon offers a number of LearnDash course-specific triggers to choose from. Whenever a particular condition is triggered, the addon will automatically award points and/or a badge to the user.
For example, you can award and show a specific achievement for completing a lesson or course. You can also display achievements for passing a quiz. You can even show an achievement banner when a student’s assignment is approved.
The addon also supports triggers for non-course activities like reading an article, commenting on an article, user registration, and more.
The LearnDash Achievements addon is available for free. You can install and activate the addon by visiting the LearnDash Addons page on your WordPress admin panel (of course, you need a valid license of LearnDash to use the addon).
How to Create Achievements Using the Achievements Addon
It’s time to show you how you can easily create an achievement using this addon. We’ll be creating an achievement for enrolling in a course.
First, you need to head over to LearnDash -> Achievements from the left sidebar of your WordPress admin panel. This will take you to the Achievements page where you’ll see 3 tabs: Achievements, Settings, and Shortcodes.
Achievements
The Achievements tab is the place where the admin can see and manage all the achievements. Let’s create a new achievement by clicking on the Add New Achievement button.
A new page will open up now with a number of fields.
In the Add title field, you should add the achievement name that’ll be displayed to the user. You can also add some text to the Message field.
The Details section is the most important part of any achievement.
The Trigger field controls when you want to award or display the achievement to the user. Go ahead to select User enrolls into a course (LearnDash) from the dropdown.
This will open up some new fields.
First, you need to select a course from the Course dropdown. Whenever someone completes that course, the achievement will be displayed to the user. You can also select All Courses to trigger the condition on completion of all the available courses.
Want to award points to the user? You can do that by configuring the Points field. And you can add any numeric value of your choice to that field.
Next, you can add an achievement image from the Image box. You can select a pre-built image by clicking on the Select Image link.
Finally, you should click on Publish to make your achievement live.
Settings
Want to change the look of the achievement banner? Maybe, you want to match it with your brand colors. Just visit the Settings tab to change the background color, text color, and even the time after which the banner fades away.
Shortcodes
The LearnDash Achievements addon offers some shortcodes to display the user achievements:
[ld_achievements_leaderboard] – It’ll display the list of users along with their points. For example, [ld_achievements_leaderboard=”10”] will display the top 10 users based on their points earned.
[ld_my_achievements] – This shortcode can display all the achievements earned by a user.
The Achievements addon also offers 2 Gutenberg blocks for displaying the individual achievements and the achievement leaderboard.
Do More With LearnDash Achievements Addon
The Achievements addon is a great addition to the LearnDash plugin. The addon makes it easy to create multiple achievements for different activities on your eLearning site.
Presently, the Achievements addon offers limited course and non-course triggers only. Want to do more with the addon? You can use the Uncanny Automator plugin and the Achievements addon together to take your gamification strategy to the next level.
In case you aren’t familiar with it, Uncanny Automator is a powerful automation plugin for WordPress. You can use it to connect WordPress plugins, WordPress sites, and third-party web apps together.
You can use the Automator plugin to collect achievements across all the plugins and tools you use, not just LearnDash. Not only that, but you can also connect our LearnDash plugins to the Achievements addon using the Automator plugin.
By connecting Uncanny Automator and LearnDash Achievements together, you can award badges and points to otherwise unsupported achievements, including the following:
The above examples are just some ideas – you can connect the Achievements addon to 75+ WordPress plugins and web apps and create unlimited achievements for your users. That means the simple Achievements addon could replace the need for additional gamification tools, all at no extra cost beyond the LearnDash license.
How to Integrate the Achievements Addon With Uncanny Automator
Let’s briefly show you how to use the Uncanny Automator plugin and the Achievements addon together with the help of an example – award an achievement to a user automatically for submitting a course evaluation form.
We’ll be using WPForms as the form plugin in our example. However, Uncanny Automator supports a wide range of form plugins like Contact Form 7, Gravity Forms, Fluent Forms, Ninja Forms, Formidable Forms, and more. So you can use any form plugin of your choice – the process will remain the same.
Whenever you need to automate a task using the Uncanny Automator plugin, you’ll have to create a recipe. And every recipe needs at least one trigger and one action. In our case, the trigger will be a user submitting a form and the action will be awarding an achievement to the user.
To create a new recipe, you need to head over to Automator -> Add new from the left sidebar of your WordPress dashboard (we’re assuming that you’ve already installed the Automator plugin). Next, you should select Logged-in users as the recipe type and then click on Confirm.
After that, you need to add a recipe title to the Add title box for future reference.
Setting Up the Trigger
The next step is to configure the trigger for our recipe. To get started, you should select WPForms from the list of available integrations.
Next, you need to select A user submits a form as the trigger option.
Selecting that option will open up the Form field. Just select the course evaluation form from the dropdown and then click on Save.
You’ve successfully configured the trigger. Let’s set up the action in the next step.
Setting Up the Action
To configure the action, you need to first click on the Add action button. Next, you’ll have to choose LearnDash under Select an integration (the Achievements addon is part of the LearnDash integration in Uncanny Automator).
You’ll see a list of options now. Just find and click on the option Award an achievement to a user.
This will open the Achievements dropdown field. Here you need to select the achievement you want to award to the user for submitting the course evaluation form.
Finally, you need to click on the Save button to make your action live.
Publish the Recipe
It’s time to publish our recipe. To do that, you need to change the toggle option in the Recipe box from Draft to Live.
Your recipe is live now. That means, whenever someone submits the course evaluation form, you can automatically award an achievement to that user.
Endnote
The LearnDash Achievements addon is a powerful tool for adding game-like elements to your eLearning site. You can even use it with the Uncanny Automator plugin to connect it to 75+ WordPress plugins and web apps. And you can use the recipe example in this article as a reference to create multiple achievements for your eLearning site.
The best part is you can add multiple triggers and actions to any recipe to create complex workflows using the Uncanny Automator plugin. For example, you can add actions like getting a notification on Slack or adding the user to a mailing list to the above recipe.
Have any questions on how to use Uncanny Automator and LearnDash Achievements addon together? Please feel free to comment below.
https://www.uncannyowl.com/wp-content/uploads/2021/12/how-to-do-more-with-the-learndash-achievements-addon.png5541600Sandipanhttps://www.uncannyowl.com/wp-content/uploads/2016/04/uncannyowl-logo-600.pngSandipan2021-12-07 13:41:432021-12-07 13:41:43How to Do More With LearnDash Achievements