Everyone learns at their own pace. Some students can run through an entire course in a day. Others might need a few weeks to really comb through the material. That’s why creating free trials for your LearnDash courses is one of the best ways to serve your students. It’s also the best conversion-boosting tool you didn’t know you had!
In this step-by-step guide, we’ll show you five different ways to set up free trials of your LearnDash courses. While all methods offer their own advantages, we’ll focus on the methods that give students the most flexibility to learn at their leisure.
Why Offer Free Trials?
If you trust your product, why not let it speak for itself? Limited trials are one of the strongest marketing tools at your disposal.
Try, Don’t Deny
Free trials offer no-risk, hands-on experience. Not only do your students get a taste of your course material but they can also immerse themselves in your community, giving them another reason to sign-up after their free trial expires. For once, your students will be the ones doing the testing—and we know that you’ll pass with flying colors!
Get a Lead, Guaranteed
More often than not, users have to register in order to start their free trial. These new registrants represent valuable leads and you can start to gather information on their needs and preferences such as their mobile versus desktop usage. Even if they don’t become a paying customer after their trial expires, you can still use their contact information to extend exclusive deals.
Remitment Commitment
Imagine getting married to a perfect stranger. You have no idea who could be waiting at the other end of the aisle! That’s kind of what it’s like when you purchase an item you’ve never sampled before—minus the unbreakable vows, expensive rings and joint tax filings. Free trials give customers the opportunity to get to know your product before they elated say, “Yes! I will mar—buy your product!”
No Lack for Feedback
Use your free trials as an opportunity to make improvements. When did most free trial registrants become paying customers? When did they fall out of the free trial? You can even send a post-trial survey, asking your customers what they enjoyed about the trial and what they would have done without. For the unconverted, offer a special discount if they complete the survey or an extended free trial for more feedback.
Convinced that you absolutely must offer free trials? Here are four simple methods to get the job done.
Method 1: LearnDash Course Access Settings
For LearnDash users who want to set up one or two simple free trial courses—separate from their regular course offerings—this is the most straightforward method.
LearnDash has a feature called Course Access Expiration built right into the Course Editor. Though this feature was designed for content protection purposes, you can also use it to create dedicated free trial courses. Here’s how it’s done:
Step 1: Create Free Trial Course
From your WordPress Admin Sidebar, navigate to LearnDash LMS > Courses. In the upper right-hand corner, click Add New and create your dedicated free trial course.
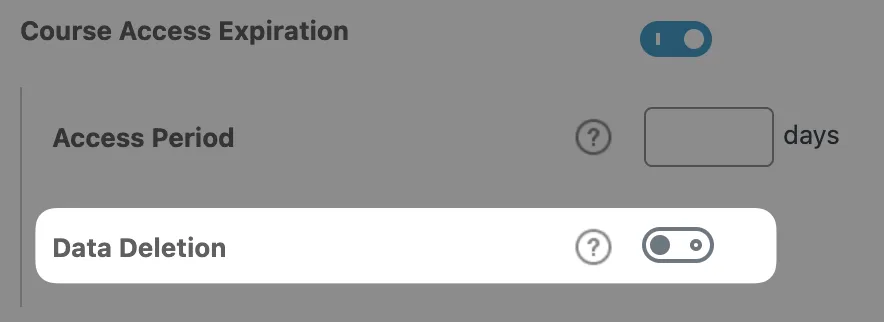
Step 2: Configure Course Access Settings
In the Course Editor, navigate to Settings and scroll down to Course Access Expiration. Toggle the button to the On position and set the length of your free trial in days.
That’s all! LearnDash will now grant access to the course for the specified number of days, starting on the user’s enrollment date. LearnDash also gives you a Data Deletion option so you can choose to either store or erase a registrant’s course data after their access has expired.
The Course Access Expiration setting works universally, meaning that it will apply to all users who register for the course. If you’re trying to set up a free trial for your existing courses, this method won’t suit your needs as you’ll have to create clones for each course for which you would like to offer a free trial. Additionally, your trial registrants won’t be able to transfer their progress from the trial course to its paid counterpart.
Method 2: Sample Lessons
LearnDash offers another very simple way for setting up free trials. Instead of time-limiting trial content, you can create lessons within courses that are free for anyone to sample. Here’s how it’s done:
- From your WordPress Admin Sidebar, navigate to LearnDash > Lessons.
- Select the lesson(s) you would like to offer as a free sample or create new ones.
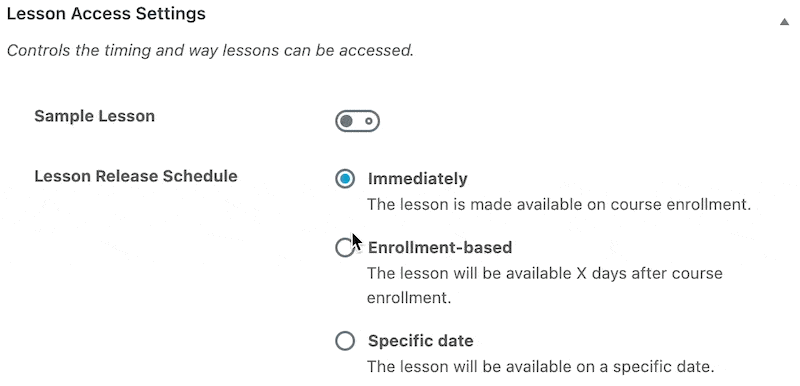
- In the Lesson Editor, navigate to Settings then scroll down to the Lesson Access Settings section.
- Toggle the button next to Sample Lesson to the On position.
- Sit back and let your courses sell themselves!
This method for creating free trials of your LearnDash courses is perfect for letting your students learn at their own pace. However, there’s no way to restrict your trial content to signed-in users only without using another plugin such as Restrict Content Pro, MemberPress or WooCommerce Memberships. Using this method, you won’t always be able to track progress and follow leads.
Method 3: WooCommerce Trial Subscriptions
We’re going to create a free trial using a subscription and the built-in free trial feature in WooCommerce. For this method, you’ll need WooCommerce Subscriptions.

After you’ve purchased WooCommerce Subscriptions, download the LearnDash WooCommerce integration for free. It’s one of the easiest ways to improve your LMS functionality and improve your students’ experience.

You’ll need to have an active LearnDash license and be logged in to download the plugin. But once you integrate your LMS with your e-commerce platform, your students will be gobbling up your courses faster than you can make new ones.
Step 1: Configure LearnDash WooCommerce Integration
LearnDash offers a detailed step-by-step guide for setting up the integration but here’s a brief walkthrough:
- After downloading the LearnDash WooCommerce plugin, from your WordPress Admin Sidebar, navigate to WooCommerce > Settings.
- Click on the Accounts & Privacy tab.
- Deselect the Allow customers to place orders without an account option.
- Select the Allow customers to log into an existing account during checkout option.
- Select the Allow customers to create an account during checkout option.
Step 2: Configure Your Subscription Product
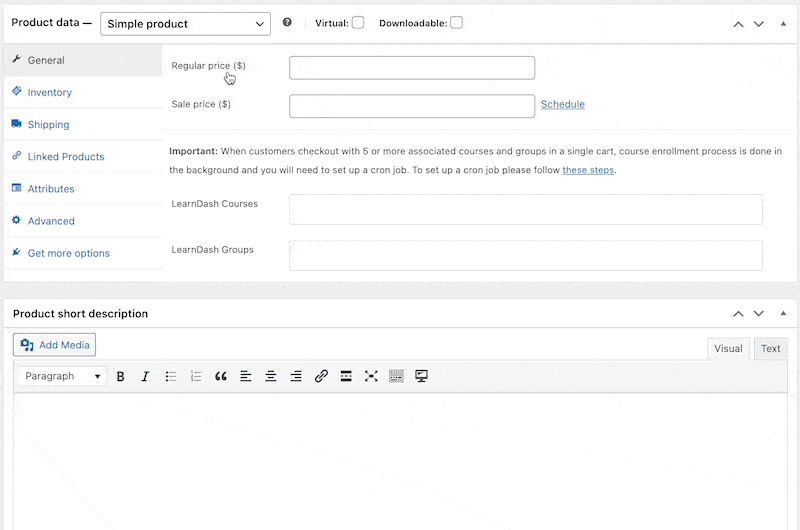
- From your WordPress Admin Sidebar, navigate to Products > Add New.
- Name your product—we named our product Free Trial Subscription—then scroll down to the Product data panel.
- From the drop-down list, select Simple subscription and click the box next to Virtual.
- Set the price, billing frequency and expiration period. As this is intended to be a free trial, set the Sign-up fee to $0.00.
- Set the length of your free trial in the Free trial field. For example, we set our free trial to 14 days. After that period, the payments will begin unless the user cancels their subscription. But with course material this good, why would they?!
- Next, thanks to the LearnDash WooCommerce integration, you can decide which of your LearnDash groups and courses this subscription product grants access to.
- Finish configuring your subscription product then click Publish. That’s it! The integration really does make it that easy.
To create even more dynamic free trials—and to save yourself a ton of time—there are a couple of other methods we highly recommend.
Method 4: Automated Free Trials for Courses
If you want to offer free trial access to an existing course, you could register and unregister students manually—but, between marking papers and offering extra lessons, who has time for all that busywork? Thankfully, there is a better way to offer free trial access to one of your existing courses where students can save their progress after their trial expires.
In order to automatically enroll and unenroll students, you’ll need a little help from Uncanny Automator and WooCommerce. Automator is the #1 WordPress automation plugin. Using recipes—combinations of triggers and actions—you can connect your favorite plugins and apps and automate your workflows to save time and money.
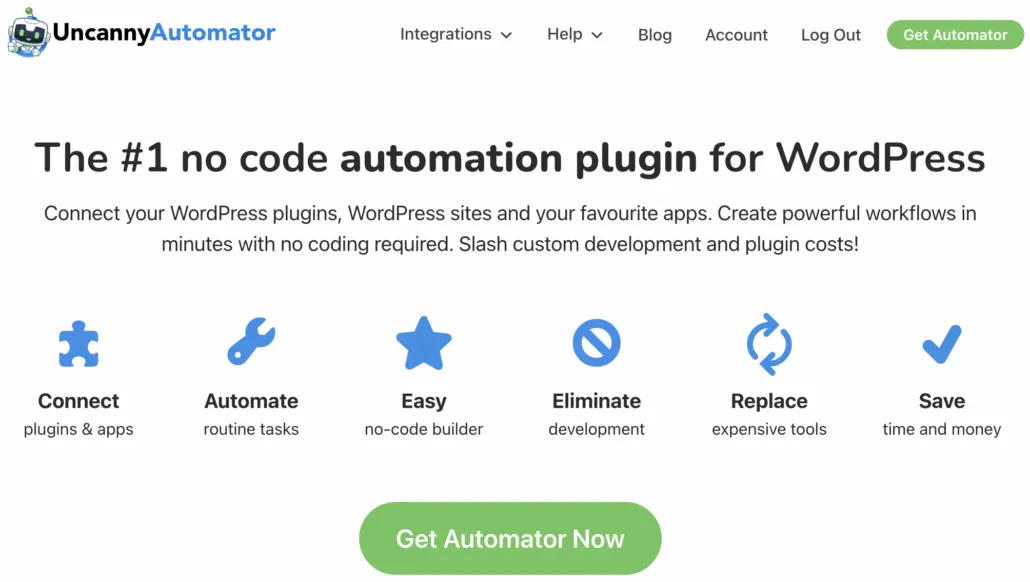
To create free trials for your LearnDash courses using Automator, you’ll need the Pro version. While the free plugin won’t be able to optimize your free trial registration process, it still offers plenty of functionality for LearnDash users. So, while we’re on the topic of free trials, download the free Automator plugin and try it out before making a decision. When you’re ready to upgrade, click here for Automator’s full pricing scheduling.
Step 1: Create a New Recipe
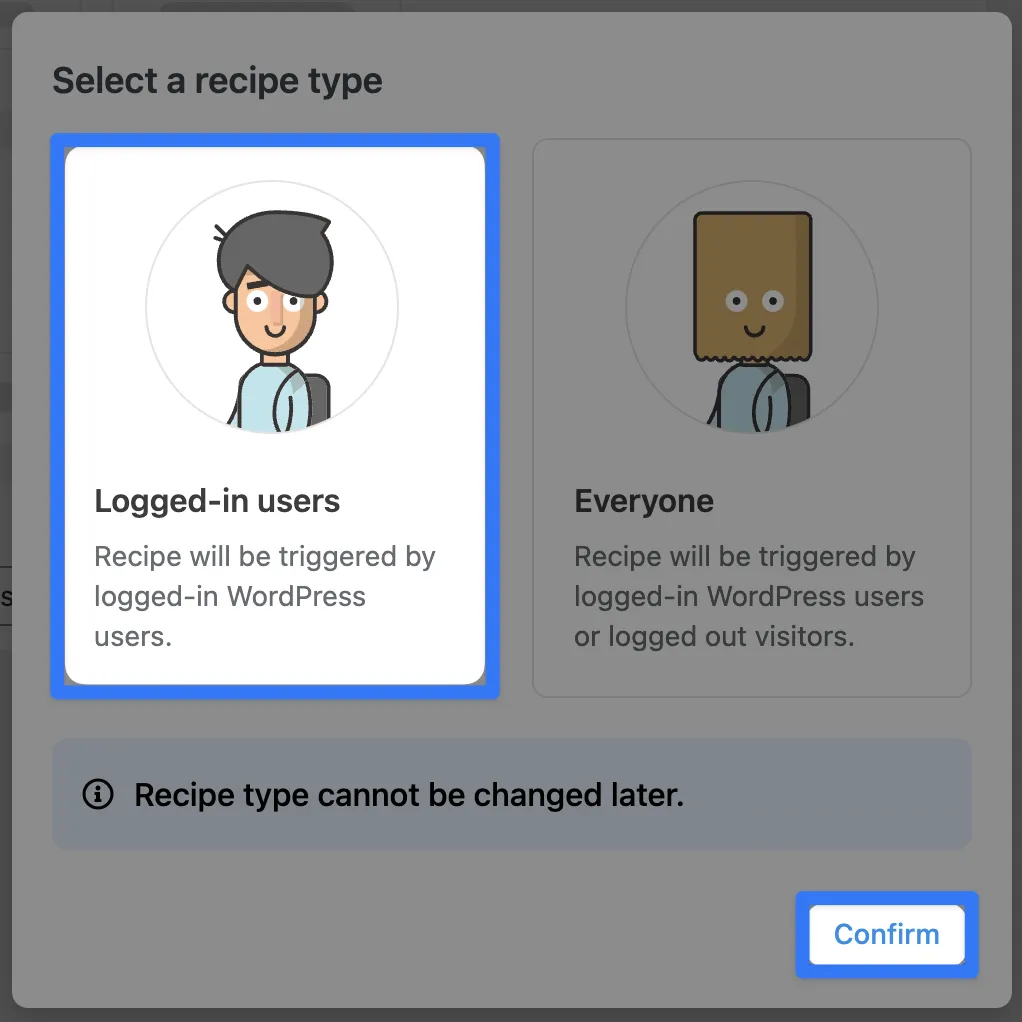
Once you’ve downloaded the plugin and registered your account, navigate to your WordPress Admin Dashboard. From the sidebar, navigate to Automator > Add New. In the pop-up window that appears, select Logged-in users.
Step 2: Name Your Recipe
Start by naming your recipe so that you can easily identify it later on. We’ve named this recipe Free Trial Registration.
Step 3: Configure Your Trigger
Automator lets you decide how you would like to register users for your free trial. You could create a sign-up sheet with WPForms or Formidable Forms or you could even register students for a free trial of an advanced course if they passed its prerequisites. In this example, we’ve simply chosen to register all new students in our free trial.
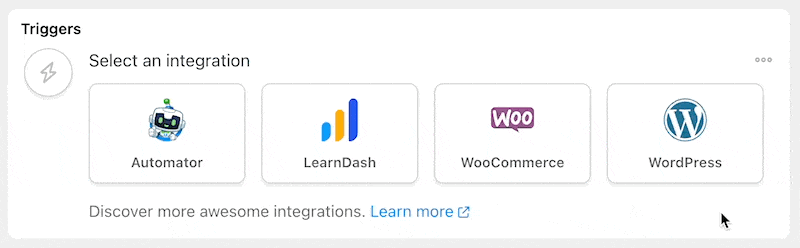
In the Triggers panel, click WordPress. Then, from the drop-down list that appears, select A user is created with a specific role. Select the role that you’ve assigned to designate students and click Save.
Make sure that your trigger is set to Live before continuing.
Step 4: Configure Your Action(s)
In the Actions panel, select LearnDash.

From the drop-down list that appears, select Enroll the user in a course. Automator will then prompt you to select the course for which you would like to offer a free trial. Click Save.

Your action should look like this:

This action will get your new students started on their free trial—but how does it end? This is where the real magic of Automator comes in.
Beneath this first action, click Add another action and LearnDash once again. From the drop-down list that appears, select Unenroll the user from a course.

Automator will prompt you to select a course. Choose the same course from your first action and click Save.
Now you’ll want to make some minor adjustments to this second action so that it doesn’t fire until the end of your new student’s free trial. To do this, hover over the three dots in the right-hand corner of the action and click Delay.

An editor window will appear where you can choose to either schedule a date for the action to fire or set a time delay. To create a free trial, set a time delay. We’ve chosen a 14-day time delay to create a 14-day free trial. After you’ve set the length of your trial, click Set delay.

Your recipe is now fully configured to automatically enroll and unenroll new students in your free trial. But what about those eager beavers who are so impressed with your course that they decide to purchase it before the end of their free trial? You can add a filter to the second action to unenroll students based on whether or not they’ve purchased course access.
Once again, hover over the three dots in the right-hand corner of the second action but this time, click Filter. In the pop-up window that appears, select WooCommerce then, from the drop-down list, select The user has not purchased a specific product. Automator will prompt you to select the product associated with granting access to your LearnDash course. Once you’ve selected the correct product, click Save filter.

Your free trial actions are now fully figured. Your Actions panel should look something like this:

Step 5: Start the Trials!
With this recipe, Automator can handle all of the busywork of registering and unregistering students in your free trial. All that you have to do now is to toggle the recipe from Draft to Live. It should look something like this:

Method 5: Automated Free Trials for Groups
It’s important that your students receive a broad education—and that they get an accurate sample of your course offerings during their free trial. If you want to offer a more generous free trial package than a single course, you can use the LearnDash Groups function in conjunction with Automator to enroll free trial participants in a whole curriculum worth of courses.
Step 1: Create a Free Trial Group
From your WordPress Admin Sidebar, navigate to LearnDash > Groups and click Add New in the upper right-hand corner. In the Edit Group page, click on Courses. You can use the field labeled Group Courses to add and remove courses from your free trial offering.

Once you’ve finished configuring the rest of your new trial group settings, click Publish.
Step 2: Create a New Recipe
Just as with the previous recipe, from your WordPress Admin Sidebar, navigate to Automator > Add New. In the pop-window that appears, select Logged-in users.
Step 3: Name Your Recipe
We’ve named this recipe Free Trial Group Registration.
Step 4: Configure Your Trigger
Just as with the previous recipe, you can choose to register trial participants using any number of apps and integrations. For this example, we’ve decided to register trial participants using Fluent Forms.

Step 5: Configure Your Action(s)
In the Actions panel, click LearnDash then select Add the user to a group. Automator will prompt you to select the free trial group that you create in Step 1 of this method. Once you’ve selected the correct group, click Save.

Beneath this first action to add the user to a group, click Add another action. From the options available, click LearnDash then, from the drop-down list, select Remove the user from a group.

Automator will prompt you to select a group. Once you’ve selected your free trial group, click Save. Next, hover over the three dots in the upper right-hand corner of this second action and click Delay. Set the delay for the duration of your free trial.
You Actions panel should look like this:

Step 6: Ready, Set, Trial!
We hope that your students are ready to sprint their way through your amazing free trial package! All you have to do now to start the learning marathon is toggle the recipe from Draft to Live. It should look like this:

Who Doesn’t Love Free Trials?
Whether you just wanted to set up a simple free trial course or wanted to offer total—albeit temporary—access to your online school, there’s a method that lets your students learn at their own pace. And, just as importantly, lets you work at your own pace.
By setting up free trials with Automator, however, you can make the most of your free trials. Add free trial participants to your mailing list with Groundhogg or MailChimp. Automatically tag the participants who didn’t opt-in after their free trial expired. And why not follow-up with an auto-generated coupon code if, after a few weeks, they still haven’t signed-up? Send free trial data to Airtable so you can better understand what drives conversions. With Automator, you can do all of that—and a lot more—and still save time and money.
What kinds of free trials would you like to offer your students? Let us know in the comments section below.